关于NIO
关于
Java NIO,即“New I/O”(另一说“No-Blocking I/O”):采用内存映射文件的方式来处理输入输出:NIO将文件或文件的一段区域映射到内存中,这样就可以像访问内存一样访问文件了。
- (相关内容:Java NIO Tutorial,网上资料大多来自于此)
与 IO
NIO与标准IO不同:NIO支持面向缓冲区的、基于通道的IO操作,以更加高效的方式进行文件的读写操作。
- (“旧”的I/O包已经使用NIO重新实现过,“即使我们不显式的使用NIO编程,也能从中受益”)
- (NIO子系统不会取代java.io包中可用的基于流的I/O类)
| IO | NIO |
|---|---|
| 面向流(Stream Oritented) | 面向缓冲区(Buffer Oritented) |
| 阻塞IO(Blocking IO) | 非阻塞IO(None Blocking IO) |
| 无 | 选择器(Selecters) |
NIO 包
从JDK1.4开始提供的一系列改进的输入/输出处理,这些类都被放在java.nio包及子包下:
| 包名称 | 使用/目的 |
|---|---|
| java.nio | NIO系统的顶级包,NIO系统封装了各种类型的缓冲区。 |
| java.nio.charset | 封装了字符集,并且还支持分别将字符转换为字节和字节到编码器和解码器的操作。 |
| java.nio.charset.spi | 用于支持字符集服务提供者 |
| java.nio.channels | 支持通道,这些通道本质上是打开I/O连接。 |
| java.nio.channels.spi | 用于支持频道的服务提供者 |
| java.nio.file | 提供对文件的支持 |
| java.nio.file.spi | 用于支持文件系统的服务提供者 |
| java.nio.file.attribute | 用于提供对文件属性的支持 |
(为什么学习NIO)
IO操作往往在两个场景下会用到:
- 文件I/O
- 网络I/O:NIO的优势体现;
【IO:同步、异步,阻塞、非阻塞】
NIO 组件
NIO中的所有I/O都是通过一个通道开始的。数据总是从缓冲区写入通道,并从通道读取到缓冲区:
Java NIO 由以下几个核心部分组成:
- “Buffer”
- “Channel”
- “Selector”
Channel
通道,是用于在实体和字节缓冲区之间有效传输数据的介质。它从一个实体读取数据,并将其放在缓冲区块中以供消费。 Java NIO Channel 不同于流:
- 既可以从通道中读取数据,又可以写数据到通道;但流的读写通常是单向的。
- 通道可以异步地读写。
- 通道中的数据总是要先读到一个Buffer,或者总是要从一个Buffer中写入。
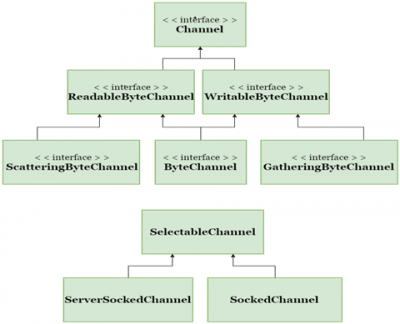
“java.nio.channels”类的层次结构:
其中顶层接口:
package java.nio.channels;

import java.io.IOException;
import java.io.Closeable;

public interface Channel extends Closeable {
    // 检查通道是否打开
    public boolean isOpen();
    // 关闭通道
    public void close() throws IOException;

}
Java NIO中,主要使用的通道如下:
- “FileChannel”:从文件中读写数据;
- “DatagramChannel”:通过UDP读写网络中的数据;
- “SocketChannel”:通过TCP读写网络中的数据;
- “ServerSocketChannel”:监听新进来的TCP连接,像Web服务器那样。对每一个新进来的连接都会创建一个SocketChannel;
示例:
RandomAccessFile aFile = new RandomAccessFile("data/nio-data.txt", "rw");
FileChannel inChannel = aFile.getChannel();

ByteBuffer buf = ByteBuffer.allocate(48);

int bytesRead = inChannel.read(buf);
while (bytesRead != -1)
{
   System.out.println("Read " + bytesRead);
   buf.flip();

   while(buf.hasRemaining())
   {
      System.out.print((char) buf.get());
   }
   buf.clear();
   bytesRead = inChannel.read(buf);
}
aFile.close();
Buffer
Java NIO中的Buffer用于和NIO通道进行交互:
在Java NIO中使用的核心缓冲区如下:
- ByteBuffer
- MappedByteBuffer
- CharBuffer
- DoubleBuffer
- FloatBuffer
- IntBuffer
- LongBuffer
- ShortBuffer
capacity、position和limit
缓冲区本质上是一块“可以写入数据,然后可以从中读取数据”的内存:这块内存被包装成“NIO Buffer”对象,并提供了一组方法,用来方便的访问该块内存。
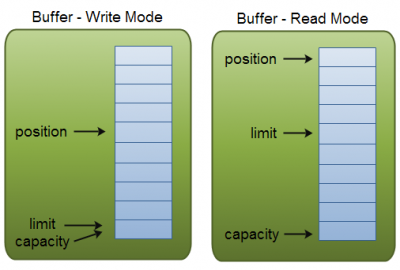
为了理解Buffer的工作原理,需要熟悉它的三个属性:
- capacity:容量;
- position:读写位置,即下一个值将在此进行读写;
- 写模式:初始的position值为0,最大可为capacity-1;
- 读模式:当将Buffer从写模式切换到读模式,position会被重置为0;
- limit:界限,即超过它进行读写是没有意义的;
- 写模式:limit等于Buffer的capacity。
- 读模式:当切换Buffer到读模式时,limit会被设置成写模式下的position值(已写入数据位置);
- 不管Buffer处在什么模式,“capacity”的含义总是一样的;
基本用法
使用Buffer读写数据,遵循以下四个步骤:
- 写入数据到Buffer; // 向buffer写入数据时,buffer会记录下写了多少数据
- 调用“flip()”方法; // 通过flip()方法将Buffer从写模式切换到读模式
- 从Buffer中读取数据; // 读模式下,可以读取之前写入到buffer的所有数据
- 调用“clear()”方法或者“compact()”方法; // 读完所有数据,就清空缓冲区让它可以再次被写入:clear()方法会清空整个缓冲区;compact()方法只会清除已经读过的数据
RandomAccessFile aFile = new RandomAccessFile("data/nio-data.txt", "rw");
FileChannel inChannel = aFile.getChannel();

//create buffer with capacity of 48 bytes
ByteBuffer buf = ByteBuffer.allocate(48);

int bytesRead = inChannel.read(buf); //read into buffer.
while (bytesRead != -1) {
   buf.flip();  //make buffer ready for read
   while(buf.hasRemaining())
   {
      System.out.print((char) buf.get()); // read 1 byte at a time
   }
   buf.clear(); //make buffer ready for writing
   bytesRead = inChannel.read(buf);
}
aFile.close();
- Buffer的分配:
// 分配48字节capacity的ByteBuffer
ByteBuffer buf = ByteBuffer.allocate(48);
// 分配一个可存储1024个字符的CharBuffer
CharBuffer buf = CharBuffer.allocate(1024);
- 向Buffer中写数据:
- 从Channel写到Buffer:
int bytesRead = inChannel.read(buf); //read into buffer.
- 通过Buffer的“put()”方法写到Buffer里:
buf.put(127);
- “put()”方法有很多版本,允许以不同的方式把数据写入到Buffer中;
- 从Channel写到Buffer:
- 从Buffer中读取数据:
- 从Buffer读取数据到Channel:
int bytesWritten = inChannel.write(buf); // read from buffer into channel.
- 使用“get()”方法从Buffer中读取数据:
byte aByte = buf.get();
- “get”方法有很多版本,允许以不同的方式从Buffer中读取数据;
- 从Buffer读取数据到Channel:
常用方法
- “flip()”:准备读入:
- 即,将“position”设回0,并将“limit”设置成之前“position”的值。
- “rewind()”:准备重新读入:
- 即,将“position”设回0,所以你可以重读Buffer中的所有数据。“limit”保持不变,仍然表示能从Buffer中读取多少个元素(byte、char等)。
- “clear()”与“compact()”:准备写入:
- “clear()”:“position”将被设回0,“limit”被设置成 capacity的值。(Buffer被清空了,但Buffer中的数据并未清除,只是这些标记告诉我们可以从哪里开始往Buffer里写数据)
- Buffer中未读数据将“被遗忘”。
- “compact()”:将所有未读的数据拷贝到Buffer起始处。然后将position设到最后一个未读元素正后面。limit属性依然像clear()方法一样,设置成capacity。
- 不会覆盖未读的数据。
- “clear()”:“position”将被设回0,“limit”被设置成 capacity的值。(Buffer被清空了,但Buffer中的数据并未清除,只是这些标记告诉我们可以从哪里开始往Buffer里写数据)
- “mark()”与“reset()”:
- 通过调用Buffer.mark()方法,可以标记Buffer中的一个特定position。之后可以通过调用Buffer.reset()方法恢复到这个position。
- “equals()”与“compareTo()”:比较两个Buffer:(剩余元素是从 position到limit之间的元素)
- “equals()”:当满足下列条件时,表示两个Buffer相等:(只是比较Buffer的一部分,不是每一个在它里面的元素都比较。实际上,它只比较Buffer中的剩余元素)
- 有相同的类型(byte、char、int等)。
- Buffer中剩余的byte、char等的个数相等。
- Buffer中所有剩余的byte、char等都相同。
- “compareTo()”:比较两个Buffer的剩余元素(byte、char等), 如果满足下列条件,则认为一个Buffer“小于”另一个Buffer:
- 第一个不相等的元素小于另一个Buffer中对应的元素。
- 所有元素都相等,但第一个Buffer比另一个先耗尽(第一个Buffer的元素个数比另一个少)。
- “equals()”:当满足下列条件时,表示两个Buffer相等:(只是比较Buffer的一部分,不是每一个在它里面的元素都比较。实际上,它只比较Buffer中的剩余元素)
Selector
Scatter / Gather
“scatter/gather”:用于描述从Channel中读取或者写入到Channel的操作:
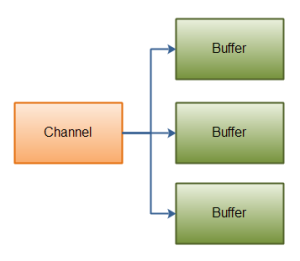
- 分散(scatter)读取:将从Channel中读取的数据“分散(scatter)”到多个Buffer中;

ByteBuffer header = ByteBuffer.allocate(128);
ByteBuffer body   = ByteBuffer.allocate(1024);

ByteBuffer[] bufferArray = { header, body };

channel.read(bufferArray);
- read()方法按照buffer在数组中的顺序将从channel中读取的数据写入到buffer,当一个buffer被写满后,channel紧接着向另一个buffer中写。
- Scattering Reads在移动下一个buffer前,必须填满当前的buffer,这也意味着它不适用于动态消息(消息大小不固定)。
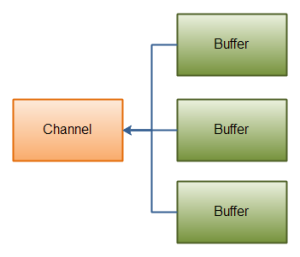
- 聚集(gather)写入:将多个Buffer中的数据“聚集(gather)”后发送到Channel;

ByteBuffer header = ByteBuffer.allocate(128);
ByteBuffer body   = ByteBuffer.allocate(1024);

//write data into buffers

ByteBuffer[] bufferArray = { header, body };

channel.write(bufferArray);
- write()方法会按照buffer在数组中的顺序,将数据写入到channel,注意只有position和limit之间的数据才会被写入。
- 与Scattering Reads相反,Gathering Writes能较好的处理动态消息。
Channel to Channel Transfers
在Java NIO中,如果两个通道中有一个是“FileChannel”,则可以直接将数据从一个channel传输到另外一个channel。
- “FileChannel.transferTo()”:将数据从FileChannel传输到其他的channel中;
RandomAccessFile fromFile = new RandomAccessFile("fromFile.txt", "rw");
FileChannel fromChannel = fromFile.getChannel();

RandomAccessFile toFile = new RandomAccessFile("toFile.txt", "rw");
FileChannel toChannel = toFile.getChannel();

long position = 0;
long count = fromChannel.size();

fromChannel.transferTo(position, count, toChannel);
- 在SoketChannel的实现中,SocketChannel只会传输此刻准备好的数据(可能不足count字节)。因此,SocketChannel可能不会将请求的所有数据(count个字节)全部传输到FileChannel中。
- “FileChannel.transferFrom()”:将数据从源通道传输到FileChannel中;
RandomAccessFile fromFile = new RandomAccessFile("fromFile.txt", "rw");
FileChannel fromChannel = fromFile.getChannel();

RandomAccessFile toFile = new RandomAccessFile("toFile.txt", "rw");
FileChannel toChannel = toFile.getChannel();

long position = 0;
long count = fromChannel.size();

toChannel.transferFrom(position, count, fromChannel);
- SocketChannel会一直传输数据直到目标buffer被填满。
常用Channel
FileChannel
FileChannel是一个连接到文件的通道。可以通过文件通道读写文件。
- FileChannel无法设置为非阻塞模式,它总是运行在阻塞模式下。
- 打开FileChannel:
- 无法直接打开一个FileChannel,需要通过使用一个“InputStream”、“OutputStream”或“RandomAccessFile”来获取一个FileChannel实例
RandomAccessFile aFile = new RandomAccessFile("data/nio-data.txt", "rw");
FileChannel inChannel = aFile.getChannel();
- 从FileChannel读取数据:
- 调用多个read()方法之一从FileChannel中读取数据。
ByteBuffer buf = ByteBuffer.allocate(48);
int bytesRead = inChannel.read(buf);
- 向FileChannel写数据:
- 调用write()方法向FileChannel中写入数据。
- FileChannel.write()是在while循环中调用的。因为无法保证write()方法一次能向FileChannel写入多少字节,因此需要重复调用write()方法,直到Buffer中已经没有尚未写入通道的字节。
String newData = "New String to write to file..." + System.currentTimeMillis();

ByteBuffer buf = ByteBuffer.allocate(48);
buf.clear();
buf.put(newData.getBytes());

buf.flip();

while(buf.hasRemaining()) {
	channel.write(buf);
}
- 关闭FileChannel:
- 用完FileChannel后必须将其关闭。
channel.close();
方法:
- “position()”:通过调用“position()”方法获取FileChannel的当前位置;通过调用“position(long pos)”方法设置FileChannel的当前位置。
long pos = channel.position();   // 获取位置
channel.position(pos +123);   // 设置位置
- “size()”:返回该实例所关联文件的大小。
long fileSize = channel.size();
- “truncate()”:截取一个文件。截取文件时,文件将中指定长度后面的部分将被删除。
channel.truncate(1024); // 截取文件的前1024个字节
- “force()”:将通道里尚未写入磁盘的数据强制写到磁盘上。
- (出于性能方面的考虑,操作系统会将数据缓存在内存中,所以无法保证写入到FileChannel里的数据一定会即时写到磁盘上。要保证这一点,需要调用force()方法。)
- force()方法有一个boolean类型的参数,指明是否同时将文件元数据(权限信息等)写到磁盘上。
channel.force(true);
DatagramChannel
DatagramChannel是一个能收发UDP包的通道。
- 因为UDP是无连接的网络协议,所以不能像其它通道那样读取和写入。
- 它发送和接收的是数据包。
- 打开 DatagramChannel:
DatagramChannel channel = DatagramChannel.open();
channel.socket().bind(new InetSocketAddress(9999));
- 接收数据:通过receive()方法从DatagramChannel接收数据。
- receive()方法会将接收到的数据包内容复制到指定的Buffer. 如果Buffer容不下收到的数据,多出的数据将被丢弃。
ByteBuffer buf = ByteBuffer.allocate(48);
buf.clear();
channel.receive(buf);
- 发送数据:通过send()方法从DatagramChannel发送数据。
- 不会通知你发出的数据包是否已收到,因为UDP在数据传送方面没有任何保证。
String newData = "New String to write to file..." + System.currentTimeMillis();

ByteBuffer buf = ByteBuffer.allocate(48);
buf.clear();
buf.put(newData.getBytes());
buf.flip();

int bytesSent = channel.send(buf, new InetSocketAddress("jenkov.com", 80));
- 以上例子:发送一串字符到”jenkov.com”服务器的UDP端口80,但因为服务端并没有监控这个端口,所以什么也不会发生。
- 连接到特定的地址:可以将DatagramChannel“连接”到网络中的特定地址的。
- 由于UDP是无连接的,连接到特定地址并不会像TCP通道那样创建一个真正的连接。而是锁住DatagramChannel,让其只能从特定地址收发数据。
channel.connect(new InetSocketAddress("jenkov.com", 80));
- 当连接后,也可以使用read()和write()方法,就像在用传统的通道一样。只是在数据传送方面没有任何保证。
int bytesRead = channel.read(buf);
int bytesWritten = channel.write(but);
SocketChannel
SocketChannel是一个连接到TCP网络套接字的通道。可以通过以下2种方式创建SocketChannel:
- 打开一个SocketChannel并连接到互联网上的某台服务器。
- 一个新连接到达ServerSocketChannel时,会创建一个SocketChannel。
- 打开 SocketChannel:
SocketChannel socketChannel = SocketChannel.open();
socketChannel.connect(new InetSocketAddress("http://jenkov.com", 80));
- 关闭 SocketChannel:
socketChannel.close();
- 从 SocketChannel 读取数据:调用read()方法之一
- 首先,分配一个Buffer。从SocketChannel读取到的数据将会放到这个Buffer中。
- 然后,调用SocketChannel.read()。该方法将数据从SocketChannel 读到Buffer中。read()方法返回的int值表示读了多少字节进Buffer里。如果返回的是-1,表示已经读到了流的末尾(连接关闭了)。
ByteBuffer buf = ByteBuffer.allocate(48);
int bytesRead = socketChannel.read(buf);
- 写入 SocketChannel:调用write()方法
String newData = "New String to write to file..." + System.currentTimeMillis();

ByteBuffer buf = ByteBuffer.allocate(48);
buf.clear();
buf.put(newData.getBytes());

buf.flip();

while(buf.hasRemaining()) {
    channel.write(buf);
}
- 注意SocketChannel.write()方法的调用是在一个while循环中的。Write()方法无法保证能写多少字节到SocketChannel。所以,我们重复调用write()直到Buffer没有要写的字节为止。
非阻塞模式
可以设置 SocketChannel 为非阻塞模式(non-blocking mode)。设置之后,就可以在异步模式下调用“connect()”,“read()”和“write()”了。
- connect():
- 如果SocketChannel在非阻塞模式下,此时调用connect(),该方法可能在连接建立之前就返回了。为了确定连接是否建立,可以调用“finishConnect()”的方法。如下:
socketChannel.configureBlocking(false);
socketChannel.connect(new InetSocketAddress("http://jenkov.com", 80));

while(!socketChannel.finishConnect() ){
    //wait, or do something else...
}
- write():
- 非阻塞模式下,write()方法在尚未写出任何内容时可能就返回了。所以需要在循环中调用write()。
- read():
- 非阻塞模式下,read()方法在尚未读取到任何数据时可能就返回了。所以需要关注它的int返回值,它会告诉你读取了多少字节。
- 非阻塞模式与选择器:
- 非阻塞模式与选择器(Selector)搭配会工作的更好,通过将一或多个SocketChannel注册到Selector,可以询问选择器哪个通道已经准备好了读取、写入等。Selector与SocketChannel的搭配使用会在后面详讲。
ServerSocketChannel
Java NIO非阻塞式服务器
其他
Pipe Path Files AsynchronousFileChannel


