RabbitMQ:SpringBoot(工作模式)
跳到导航
跳到搜索
关于
无论使用 RabbitMQ 那种工作模式,区别就是使用的交换机(Exchange)类型和路由参数不一样。
- 简单队列、Work模式,底层会使用默认的交换机(Direct交换机);
以下示例,生产者、消费者位于不同项目,所以两个项目都需要:引入Maven依赖、RabbitMQ配置、队列/交换机配置(使用“全注解方式定义队列监听器”则客户端不需要该配置)。
- 根据不同的工作模式,生成者、消费者并都不需要配置队列/交换机;(见:RabbitMQ:Java)
以下,生产者、消费者均省略了“Maven依赖”、“配置文件内容”:
- Maven依赖:
<dependency>
    <groupid>org.springframework.boot</groupid>
    <artifactid>spring-boot-starter-amqp</artifactid>
</dependency>
- 目前 Java 操作 RabbitMQ 主要使用 Springboot 的 spring-boot-starter-amqp 包, 其实就是使用 Spring AMQP 操作队列。
- 配置 RabbitMQ:修改application.yml配置。
spring:
  rabbitmq:
    # rabbitMQ服务器地址
    host: localhost
    port: 5672
    username: guest
    password: guest
快速入门(简单队列)
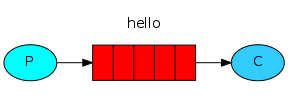
Java RabbitMQ最简单的队列模式就是一个生产者和一个消费者。
发送消息
- 配置队列:
- 通过 springboot 的 configuration 类配置队列:
package com.tizi365.rabbitmq.config;

import org.springframework.amqp.core.Queue;
import org.springframework.context.annotation.Bean;
import org.springframework.context.annotation.Configuration;

@Configuration
public class QueueConfig {
    @Bean
    public Queue helloQueue() {
        // 声明队列, 队列名需要唯一
        return new Queue("hello");
    }
}
- 可以根据业务需要定义多个队列,Queue name(队列名)和 Bean id(此处即方法名)不一样即可。
- 如上,Bean id:“helloQueue”;Queue name:“hello”;
- 发送消息:
- 发送消息需要用到 RabbitTemplate 类,springboot已经帮我们初始化,注入实例即可:
package com.tizi365.rabbitmq.service;

import org.springframework.amqp.core.Queue;
import org.springframework.amqp.rabbit.core.RabbitTemplate;
import org.springframework.beans.factory.annotation.Autowired;
import org.springframework.beans.factory.annotation.Qualifier;
import org.springframework.scheduling.annotation.Scheduled;
import org.springframework.stereotype.Service;

@Service
public class SendService {
    // 注入RabbitTemplate实例
    @Autowired
    private RabbitTemplate template;

    // 注入前面定义的队列
    @Autowired
    @Qualifier("helloQueue")
    private Queue helloQueue;

    // 为了演示,这里使用spring内置的定时任务,定时发送消息(每秒发送一条消息)
    @Scheduled(fixedDelay = 1000, initialDelay = 1000)
    public void send() {
        // 消息内容
        String message = "Hello World!";

        // 发送消息
        // 第一个参数是路由参数,这里使用队列名作为路由参数
        // 第二个参数是消息内容,支持任意类型,只要支持序列化
        template.convertAndSend(helloQueue.getName(), message);

        System.out.println("发送消息 '" + message + "'");
    }
}
- 这里没有直接使用交换机(exchange),底层会使用默认的交换机(Direct交换机???)。
接收消息
- 配置队列:
- 通过 springboot 的 configuration 类配置队列:
package com.tizi365.rabbitmq.config;

import org.springframework.amqp.core.Queue;
import org.springframework.context.annotation.Bean;
import org.springframework.context.annotation.Configuration;

@Configuration
public class QueueConfig {
    @Bean
    public Queue helloQueue() {
        // 声明队列, 队列名需要唯一
        return new Queue("hello");
    }
}
- 接收消息:
- 接收消息需要用 @RabbitListener(queues = "xxx") 注解指定接受哪个 Queue 的消息:
- “@RabbitListener”注解可以作用在类上,也可以作用在方法上;
- 如果其定义在类上,则需要配合“@RabbitHandler”注解标记由那个类方法执行消息处理。
package com.tizi365.rabbitmq.listener;

import org.springframework.amqp.rabbit.annotation.RabbitHandler;
import org.springframework.amqp.rabbit.annotation.RabbitListener;
import org.springframework.stereotype.Component;

@Component
// 声明消息监听器,通过queues参数指定监听的队列,需要跟前面的队列名保持一致
@RabbitListener(queues = "hello")
public class HelloListener {
    // 使用RabbitHandler标记消息处理器,用来执行消息处理逻辑
    @RabbitHandler
    public void receive(String msg) {
        System.out.println("消费者 - 收到消息 '" + msg + "'");
    }
}
Work模式
Java RabbitMQ Work模式,就是配置多个消费者消费一个队列的消息,可以提高消息的并发处理速度:
接收消息(配置多个消费者)
通过@RabbitListener注解,配置concurrency参数即可实现。
如下,启动10个消费者并发处理消息:
package com.tizi365.rabbitmq.listener;

import org.springframework.amqp.rabbit.annotation.RabbitHandler;
import org.springframework.amqp.rabbit.annotation.RabbitListener;
import org.springframework.stereotype.Component;

@Component
// 声明消息监听器,通过queues参数指定监听的队列
// 关键参数:concurrency 代表当前监听器需要启动多少个消费者,类型是字符串
@RabbitListener(queues = "hello", concurrency = "10")
public class HelloListener {
    // 使用RabbitHandler标记消息处理器,用来执行消息处理逻辑
    @RabbitHandler
    public void receive(String msg) {
        System.out.println("消费者 - 收到消息 '" + msg + "'");
    }
}
发布订阅模式
Java RabbitMQ发布订阅模式(广播模式、fanout模式),使用的交换机类型为FanoutExchange,就是一个生产者发送的消息会被多个队列的消费者处理:
发送消息
- 配置交换机:
package com.tizi365.rabbitmq.config;

import org.springframework.amqp.core.FanoutExchange;
import org.springframework.context.annotation.Bean;
import org.springframework.context.annotation.Configuration;

@Configuration
public class QueueConfig {
    // 定义交换机
    @Bean
    public FanoutExchange fanout() {
        // 参数为交换机名字,不能重复
        return new FanoutExchange("tizi365.fanout");
    }
}
- 发送消息:
package com.tizi365.rabbitmq.service;

import org.springframework.amqp.core.FanoutExchange;
import org.springframework.amqp.rabbit.core.RabbitTemplate;
import org.springframework.beans.factory.annotation.Autowired;
import org.springframework.scheduling.annotation.Scheduled;
import org.springframework.stereotype.Service;

@Service
public class SendService {
    @Autowired
    private RabbitTemplate template;
    @Autowired
    private FanoutExchange fanout;

    // 为演示,这里使用定时任务,每秒发送一条消息
    @Scheduled(fixedDelay = 1000, initialDelay = 1000)
    public void send() {
        // 消息内容
        String message = "Hello World!";
        // 发送消息
        // 第一个参数是交换机名字
        // 第二个参数是路由参数,fanout交换机会忽略路由参数,所以不用设置
        // 第三个参数是消息内容,支持任意类型,只要支持序列化
        template.convertAndSend(fanout.getName(), "", message);
        System.out.println("发送消息 '" + message + "'");
    }
}
接收消息
- 配置交换机、队列及绑定:
package com.tizi365.rabbitmq.config;

import org.springframework.amqp.core.FanoutExchange;
import org.springframework.context.annotation.Bean;
import org.springframework.context.annotation.Configuration;

@Configuration
public class QueueConfig {
    // 定义交换机
    @Bean
    public FanoutExchange fanout() {
        // 参数为交换机名字,不能重复
        return new FanoutExchange("tizi365.fanout");
    }

    @Bean
    public Queue queue1() {
        // 定义队列1
        return new Queue("tizi365.fanout.queue1");
    }

    @Bean
    public Queue queue2() {
        // 定义队列2
        return new Queue("tizi365.fanout.queue2");
    }

    @Bean
    public Binding binding1(FanoutExchange fanout, Queue queue1) {
        // 定义一个绑定关系,将队列1绑定到fanout交换机上
        return BindingBuilder.bind(queue1).to(fanout);
    }

    @Bean
    public Binding binding2(FanoutExchange fanout, Queue queue2) {
        // 定义一个绑定关系,将队列2绑定到fanout交换机上
        return BindingBuilder.bind(queue2).to(fanout);
    }
}
- 接收消息:
package com.tizi365.rabbitmq.listener;

import org.springframework.amqp.rabbit.annotation.RabbitListener;
import org.springframework.stereotype.Component;

// 将当前类交给Spring管理
@Component
public class DemoListener {
    // 定义一个监听器,通过queues参数指定监听那个队列
    @RabbitListener(queues = "tizi365.fanout.queue1")
    public void receive1(String msg) {
        System.out.println("收到队列1的消息 = " + msg);
    }

    // 定义一个监听器,通过queues参数指定监听那个队列
    @RabbitListener(queues = "tizi365.fanout.queue2")
    public void receive2(String msg) {
        System.out.println("收到队列2的消息 = " + msg);
    }
}
- 每一条消息,都会分发给所有绑定到当前交换机的队列中,消息会被上面的两个方法分别处理。
全注解方式定义队列监听器
直接通过 @RabbitListener 注解的 bindings 参数定义绑定关系、队列、交换机:
- 不再需要消费者项目的配置类定义内容(交换机、队列和绑定关系);
@RabbitListener(bindings = { @QueueBinding( value = @Queue(name = "tizi365.fanout.queue3", durable = "true"),
                                            exchange = @Exchange(name = "tizi365.fanout", durable = "true", type = ExchangeTypes.FANOUT),
                                            // key = ""
                                            )
                            })
public void receive3(String msg) {
    System.out.println("收到队列3的消息 = " + msg);
}
说明:
- QueueBinding 注解:定义队列和交换机的绑定关系:“value”参数用于定义队列,“exchange”用于定义交换机;
- Queue 注解:定义一个队列:“name”参数定义队列名(需要唯一),“durable”参数表示是否需要持久化;
- Exchange 注解:定义一个交换机:“name”参数定义交换机的名字,“type”参数表示交换机的类型;
路由模式
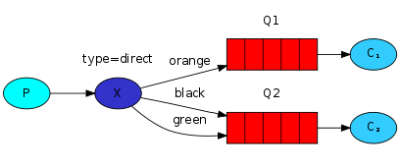
Java RabbitMQ路由模式(Direct模式),使用的交换机类型为DirectExchange,跟发布订阅模式的区别就是 Direct 交换机将消息投递到路由参数完全匹配的队列中。
发送消息
- 配置交换机:
package com.tizi365.rabbitmq.config;
import org.springframework.amqp.core.*;
import org.springframework.context.annotation.Bean;
import org.springframework.context.annotation.Configuration;

@Configuration
public class QueueConfig {
    @Bean
    public DirectExchange direct() {
        // 定义交换机
        // 参数为交换机名字,不能重复
        return new DirectExchange("tizi365.direct");
    }
}
- 发送消息:
package com.tizi365.rabbitmq.service;

import org.springframework.amqp.core.DirectExchange;
import org.springframework.amqp.rabbit.core.RabbitTemplate;
import org.springframework.beans.factory.annotation.Autowired;
import org.springframework.scheduling.annotation.Scheduled;
import org.springframework.stereotype.Service;

@Service
public class SendService {
    @Autowired
    private RabbitTemplate template;
    @Autowired
    private DirectExchange direct;

    // 为演示,这里使用定时任务,每秒发送一条消息
    @Scheduled(fixedDelay = 1000, initialDelay = 1000)
    public void send() {
        // 消息内容
        String message = "Hello World!";
        // 发送消息
        // 第一个参数是交换机名字
        // 第二个参数是路由参数,direct交换机将消息投递到路由参数匹配tizi365的队列
        // 第三个参数是消息内容,支持任意类型,只要支持序列化
        template.convertAndSend(direct.getName(), "tizi365", message);
        System.out.println("发送消息 '" + message + "'");
    }
}
接收消息
- 配置交换机、队列及绑定:
package com.tizi365.rabbitmq.config;
import org.springframework.amqp.core.*;
import org.springframework.context.annotation.Bean;
import org.springframework.context.annotation.Configuration;

@Configuration
public class QueueConfig {
    @Bean
    public DirectExchange direct() {
        // 定义交换机
        // 参数为交换机名字,不能重复
        return new DirectExchange("tizi365.direct");
    }

    @Bean
    public Queue queue1() {
        // 定义队列1
        return new Queue("tizi365.direct.queue1");
    }

    @Bean
    public Queue queue2() {
        // 定义队列2
        return new Queue("tizi365.direct.queue2");
    }

    @Bean
    public Binding binding1(DirectExchange direct, Queue queue1) {
        // 定义一个绑定关系,将队列1绑定到direct交换机上, 路由参数为:tizi365
        // 路由参数匹配tizi365,交换机将消息投递到队列1
        return BindingBuilder.bind(queue1).to(direct).with("tizi365");
    }

    @Bean
    public Binding binding2(DirectExchange direct, Queue queue2) {
        // 定义一个绑定关系,将队列2绑定到direct交换机上, 路由参数为:baidu
        // 路由参数匹配baidu,交换机将消息投递到队列2
        return BindingBuilder.bind(queue2).to(direct).with("baidu");
    }
}
- 接受消息:
package com.tizi365.rabbitmq.listener;

import org.springframework.amqp.rabbit.annotation.*;
import org.springframework.stereotype.Component;

// 将当前类交给Spring管理
@Component
public class DemoListener {
    // 定义一个监听器,通过queues参数指定监听那个队列
    @RabbitListener(queues = "tizi365.direct.queue1")
    public void receive1(String msg) {
        System.out.println("收到队列1的消息 = " + msg);
    }

    // 定义一个监听器,通过queues参数指定监听那个队列
    @RabbitListener(queues = "tizi365.direct.queue2")
    public void receive2(String msg) {
        System.out.println("收到队列2的消息 = " + msg);
    }
}
主题模式
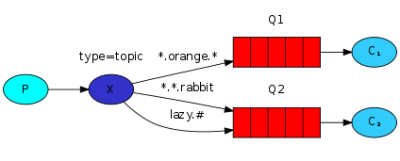
Java RabbitMQ 主题模式(Topic模式),使用的交换机类型为TopicExchange,跟路由模式(Direct)的区别就路由参数支持模糊匹配。
- 因为路由匹配比较灵活,所以是比较常用的模式;
发送消息
- 配置交换机:
package com.tizi365.rabbitmq.config;
import org.springframework.amqp.core.*;
import org.springframework.context.annotation.Bean;
import org.springframework.context.annotation.Configuration;

@Configuration
public class QueueConfig {
    @Bean
    public TopicExchange topic() {
        // 定义交换机
        // 参数为交换机名字,不能重复
        return new TopicExchange("tizi365.topic");
    }
}
- 发送信息:
package com.tizi365.rabbitmq.service;

import org.springframework.amqp.core.DirectExchange;
import org.springframework.amqp.core.TopicExchange;
import org.springframework.amqp.rabbit.core.RabbitTemplate;
import org.springframework.beans.factory.annotation.Autowired;
import org.springframework.scheduling.annotation.Scheduled;
import org.springframework.stereotype.Service;

@Service
public class SendService {
    @Autowired
    private RabbitTemplate template;
    @Autowired
    private TopicExchange topic;

    // 为演示,这里使用定时任务,每秒发送一条消息
    @Scheduled(fixedDelay = 1000, initialDelay = 1000)
    public void send() {
        // 消息内容
        String message = "Hello World!";
        // 发送消息
        // 第一个参数是交换机名字
        // 第二个参数是路由参数,topic交换机将消息投递到路由参数匹配的队列
        // 第三个参数是消息内容,支持任意类型,只要支持序列化
        template.convertAndSend(topic.getName(), "www.tizi365.com", message);
        System.out.println("发送消息 '" + message + "'");
    }
}
接收消息
- 配置交换机、队列及绑定:
package com.tizi365.rabbitmq.config;
import org.springframework.amqp.core.*;
import org.springframework.context.annotation.Bean;
import org.springframework.context.annotation.Configuration;

@Configuration
public class QueueConfig {
    @Bean
    public TopicExchange topic() {
        // 定义交换机
        // 参数为交换机名字,不能重复
        return new TopicExchange("tizi365.topic");
    }

    @Bean
    public Queue queue1() {
        // 定义队列1
        return new Queue("tizi365.topic.queue1");
    }

    @Bean
    public Queue queue2() {
        // 定义队列2
        return new Queue("tizi365.topic.queue2");
    }

    @Bean
    public Binding binding1(TopicExchange topic, Queue queue1) {
        // 定义一个绑定关系,将队列1绑定到topic交换机上, 路由参数为:*.tizi365.com
        return BindingBuilder.bind(queue1).to(topic).with("*.tizi365.com");
    }

    @Bean
    public Binding binding2(TopicExchange topic, Queue queue2) {
        // 定义一个绑定关系,将队列2绑定到direct交换机上, 路由参数为:*.baidu.com
        return BindingBuilder.bind(queue2).to(topic).with("*.baidu.com");
    }
}
- 支持的通配符:“#”匹配一个或多个单词;“*”:仅匹配一个单词。
- 接受消息:
package com.tizi365.rabbitmq.listener;

import org.springframework.amqp.rabbit.annotation.*;
import org.springframework.stereotype.Component;

// 将当前类交给Spring管理
@Component
public class DemoListener {
    // 定义一个监听器,通过queues参数指定监听那个队列
    @RabbitListener(queues = "tizi365.topic.queue1")
    public void receive1(String msg) {
        System.out.println("收到队列1的消息 = " + msg);
    }

    // 定义一个监听器,通过queues参数指定监听那个队列
    @RabbitListener(queues = "tizi365.topic.queue2")
    public void receive2(String msg) {
        System.out.println("收到队列2的消息 = " + msg);
    }
}


