Redis:常用命令
关于Redis
Remote Dictionary Server(Redis) 是一个开源的由Salvatore Sanfilippo使用ANSI C语言编写的key-value数据存储服务器。其值(value)可以是 字符串(String), 哈希(Map), 列表(list), 集合(sets) 和 有序集合(sorted sets)等类型,所以它通常也被称为数据结构服务器。
- redis属于NoSQL数据库,NoSQL数据库叫非关系型数据库,(NoSQL = Not Only SQL),意即"不仅仅是SQL"。
- 数据库类型:
- key-value存储:“Berkeley DB”、“MemcacheDB”、“Redis”;【Memcache不能持久化???】
- 文档存储:“MongoDB”、“CouchDB”;
- 列存储:“Hbase”、“Cassandra”;
redis的特点:
- redis足够简单和稳定
- 支持丰富的数据结构
- 内存存储读写性能优秀
- 提供持久化的支持
- 支持部分事务操作
下载安装
- 官网:“https://redis.io/”
- 下载:
- 安装:
- 解压:tar -zxvf redis-3.2.9.tar.gz
- 切换目录: cd redis-3.2.9,执行命令:make
- 将 src下的可执行文件复制到/usr/local/bin 目录下,再执行 make install
- 启动:(切换到 redis-3.2.9/src/ 目录执行命令)
- 后台启动:“./redis-server & ”
- 后台启动并输出日志到nohup.out文件:“nohup /usr/local/redis-3.2.9/src/redis-server &”
- 关闭:(结束进程:kill pid 或者 kill -9 pid)
- 切换到 redis-3.2.9/src/ 目录执行:“./redis-cli shutdown”
客户端
redis命令行客户端:
- redis-cli(Redis Command Line Interface)是Redis自带的基于命令行的Redis客户端,用于与服务端交互,我们可以使用该客户端来执行redis的各种命令。
- 直接连接redis (默认ip127.0.0.1,端口6379):“./redis-cli”
- 指定IP和端口连接redis:“./redis-cli -h 127.0.0.1 -p 6379”
redis远程客户端:
- Redis Desktop Manager
- 官网:https://redisdesktop.com/
- 远程连接redis需要修改redis主目录下的“redis.conf”配置文件:
- “bind ip”绑定ip注释掉;
- “protected-mode yes”保护模式改为no;
- phpRedisAdmin
- (需要本地安装php运行环境)
redis编程客户端(Java):(类似于数据库驱动)使用它提供的API就能访问服务器上的redis并对它进行各种操作。
- Jedis,redis的Java编程客户端,Redis官方首选推荐使用Jedis,jedis是一个很小但很健全的redis的java客户端
- jedis完全兼容redis 2.8.x and 3.x.x
- Jedis源码:https://github.com/xetorthio/jedis
- api文档:http://xetorthio.github.io/jedis/
- Lettuce:可伸缩线程安全的Redis客户端。多个线程可以共享同一个“RedisConnection”。它利用优秀netty NIO框架来高效地管理多个连接。
- redis的其他编程语言客户端:C、C++、C#、Erlang、Lua、Objective-C、Perl、PHP、Python、Ruby、Scala、Go,等40多种语言都有连接redis的编程客户端;
Redis基础
- “redis.conf”是Redis的配置文件;
- redis默认为16个库(默认自动使用0号库);
redis手册:
- redis英文版命令大全:“https://redis.io/commands”
- redis中文版命令大全:“http://redisdoc.com/”
基础命令:
- 验证安装:(redis-cli等链接后)输入“ping”(redis返回“PONG”表示服务运行正常);
- 切换库命令:“select <db>”;
- 删除所有库的数据:“flushall”;
- 删除当前库的数据:“flushdb”;
- 获得redis的所有配置值:“config get *”;
- redis-cli退出当前redis连接:“exit”或“quit”;
- 查看当前数据库中key的数目:“dbsize”;
- 查看redis服务器的统计信息:“info”;
1 + 5 命令:
- 1种key操作:“key”命令,redis以key-value存储数据,所有的操作均为对key的操作:
| 命令 | 说明 |
|---|---|
| keys * | 列出所有的key |
| exists <key> | 检查某个key是否存在 |
| move <key> db | 将当前库的key移动到给定的库db中,比如:move k1 2 |
| expire <key> seconds | 设置key的值的过期时间 |
| ttl <key> | ttl(time to live)查看key还有多少秒过期,-1永不过期,-2已过期或key不存在 |
| type <key> | 查看key所储存的值的类型 |
| del <key> | 删除key |
- 5种数据类型操作:
| 数据类型 | 说明 |
|---|---|
| string | 字符串类型 |
| hash | 哈希类型 |
| list | 列表类型 |
| set | 集合类型 |
| zset(sorted set) | 有序集合类型 |
Java操作redis
- jedis的jar包依赖Maven配置:(jedis也依赖“Apache Commons Pool 2 2.0”)
<dependency>
    <groupId>redis.clients</groupId>
    <artifactId>jedis</artifactId>
    <version>2.9.0</version>
</dependency>
- 使用jedis:
   public static void main(String[] args) {
      //连接Redis服务器
      Jedis jedis = new Jedis("192.168.1.103", 6379);
      //查看服务是否运行正常
      System.out.println("服务正在运行: " + jedis.ping());
   }
5种数据类型
string
字符串类型:字符串类型是Redis中最基本的数据类型;
- 它能存储任何形式的字符串,包括二进制数据,序列化后的数据,JSON化的对象甚至是一张图片。

| 命令 | 说明 |
|---|---|
| set <key> <value> | 将字符串值 value 设置到 key 中; |
| get <key> | 获取 key 中设置的字符串值; |
| incr <key> | 将 key 中储存的数字值加1;
|
| decr <key> | 将 key 中储存的数字值减1;
|
| setex <key> <seconds> <value> | “set expire”的简写,设置key的值 ,并将 key 的生存时间设为 seconds (以秒为单位) ; |
| setnx <key> <value> | setnx 是“set if not exists”的简写,如果key不存在,则设置值,存在则不设置值; |
| getset <key> <value> | 设置 key 的值为 value ,并返回 key 的旧值; |
| strlen <key> | 返回 key 所储存的字符串值的长度; |
| append <key> <value> | 如果 key 存在且是字符串, 则将 value 追加到 key 原来旧值的末尾;
|
| incrby <key> <increment> | 将 key 所储存的值加上增量值;
|
| decrby <key> <decrement> | 将 key 所储存的值减去减量值;
|
| getrange <key> <start> <end> | 获取 key 中字符串值从 start 开始 到 end 结束 的子字符串; |
| setrange <key> <offset> <value> | 从指定的位置开始将key的值替换为新的字符串; |
| mset <key> <value> [<key> <value>] | 同时设置一个或多个 key-value 对 |
| mget <key> [<key>] | 获取所有(一个或多个)给定 key 的值 |
| msetnx <key> <value> [<key> <value>] | 同时设置一个或多个 key-value 对,当且仅当所有给定 key 都不存在时才能设置成功,否则只要有一个key存在都会失败 |
hash
哈希类型:是一个string类型的field和value的映射表;
- hash特别适合用于存储对象。

(命令前加了“h”,对“key”及“field(域)”和“value”操作)
| 命令 | 说明 |
|---|---|
| hset <key> <field> <value> | 将哈希表 key 中的域 field 的值设为 value |
| hget <key> <field> 获取哈希表 key 中给定域 field 的值 | |
| hmset <key> <field> <value> [<field> <value>] | 同时将多个 field-value (域-值)对设置到哈希表 key 中 |
| hmget <key> <field> [<field>] | 获取哈希表 key 中一个或多个给定域的值 |
| hgetall <key> | 获取哈希表 key 中所有的域和值 |
| hdel <key> <field> [<field>] | 删除哈希表 key 中的一个或多个指定域field |
| hkeys <key> | 查看哈希表 key 中的所有field域 |
| hvals <key> | 查看哈希表 key 中所有域的值 |
| hlen <key> | 获取哈希表 key 中域field的个数 |
| hexists <key> <field> | 查看哈希表 key 中,给定域 field 是否存在 |
| hincrby <key> <field> <increment> | 为哈希表 key 中的域 field 的值加上增量 increment |
| hincrbyfloat <key> <field> <increment> | 为哈希表 key 中的域 field 加上浮点数增量 increment |
| hsetnx <key> <field> <value> | 将哈希表 key 中的域 field 的值设置为 value ,当且仅当域 field 不存在的时候才设置,否则不设置 |
list
列表类型:简单的字符串列表,按照插入顺序排序。
- 可以添加一个元素导列表的头部(左边)或者尾部(右边);【???】

(命令前加了“l”,,对“key”和“value”操作,对元素进行类似于队列的操作)
| 命令 | 说明 |
|---|---|
| lpush <key> <value> [<value>] | 将一个或多个值 value 插入到列表 key 的表头(最左边) |
| rpush <key> <value> [<value>] | 将一个或多个值 value 插入到列表 key 的表尾(最右边) |
| lrange <key> <start> <stop> | 获取列表 key 中指定区间内的元素
|
| lpop <key> | 从左边获取列表 key 的一个元素,并将该元素移除 |
| rpop <key> | 从右边获取列表 key 的一个元素,并将该元素移除 |
| lindex <key> <index> | 获取列表 key 中下标为指定 index 的元素 |
| llen <key> | 获取列表 key 的长度 |
| lrem <key> <count> <value> | 从左到右删除列表中指定个数的“与指定value值相等的”value |
| ltrim <key> <start> <stop> | 删除指定区域外的元素,比如LTRIM list 0 2 ,表示只保留列表 list 的前三个元素,其余元素全部删除 |
| rpoplpush <source> <destination> | “RPOPLPUSH source destination”将列表 source 中的最后一个元素(尾元素)弹出插入到列表 destination ,作为 destination 列表的的头元素 |
| lset <key> <index> <value> | 将列表 key 下标为 index 的元素的值设置为 value |
| linsert <key> BEFORE|AFTER <pivot> <value> | 将值 value 插入到列表 key 当中位于值 pivot 之前或之后的位置 |
set
集合类型:string类型的无序集合,集合成员是唯一的,即集合中不能出现重复的数据;

(命令前加了“s”,对“key”和“member”操作)
| 命令 | 说明 |
|---|---|
| sadd <key> <member> [<member>] | 将一个或多个 member 元素加入到集合 key 当中,已经存在于集合的 member 元素将不会再加入 |
| smembers <key> | 获取集合 key 中的所有成员元素 |
| sismember <key> <member> | 判断 member 元素是否是集合 key 的成员 |
| scard <key> | 获取集合里面的元素个数 |
| srem <key> <member> [<member>] | 删除集合 key 中的一个或多个 member 元素 |
| srandmember <key> [count] | 随机返回集合中的一个元素【???】 |
| spop <key> [count] | 随机从集合中删除一个元素 |
| smove <source> <destination> <member> | 将 member 元素从一个集合移动到另一个集合 |
zset(sorted set)
有序集合类型:(有序的set)不同的是zset的每个元素都会关联一个分数(分数可以重复),redis通过分数来为集合中的成员进行从小到大的排序。

(命令前加了“z”,对“key”及“member”和“score”操作)
| 命令 | 说明 |
|---|---|
| XX] [CH] [INCR] <score> <member> [<score> <member>] | 将一个或多个 member 元素及其 score 值加入到有序集合 key 中 |
| zrem <key> <member> [<member>] | 删除有序集合 key 中的一个或多个成员 |
| zcard <key> | 获取有序集 key 的元素成员的个数 |
| zrank <key> <member> | 获取有序集 key 中成员 member 的排名,有序集成员按 score 值从小到大顺序排列 |
| zrevrank <key> <member> | 获取有序集 key 中成员 member 的排名,有序集成员按 score 值从大到小顺序排列 |
| zrangebyscore <key> <min> <max> [WITHSCORES] [LIMIT offset count] | 获取有序集 key 中,所有 score 值介于 min 和 max 之间的成员【有啥区别】 |
| zrevrangebyscore <key> <min> <max> [WITHSCORES] [LIMIT offset count] | 获取有序集 key 中, score 值介于 max 和 min 之间的所有的成员【有啥区别】 |
| zcount <key> <min> <max> | 获取有序集 key 中,所有 score 值介于 min 和 max 之间的成员的个数 |
| zrange <key> <start> <stop> [WITHSCORES] | 获取有序集 key 中,指定区间内的成员,按 score 值从小到大排列【?】 |
| zrevrange <key> <start> <stop> [WITHSCORES] | 获取有序集 key 中,指定区间内的成员,按 score 值从大到小排列【?】 |
发布和订阅
发布订阅是消息队列的一种方式,基于消息队列的方式,可以实现系统解耦、削峰填谷,顶住流量洪峰;
- redis的主业目前是基于键值对的数据存储、缓存等,消息队列可能是redis的一种尝试;
- 常用的流行的消息队列有:“ActiveMQ”、“RabbitMQ”等;
什么是发布订阅
Redis 发布订阅(pub/sub)是一种消息通信模式:发送者(publish)发送消息,订阅者(subscribe)接收消息。
- 发布订阅也叫“生产者消费者”模式,是实现“消息队列”的一种方式;
- 消息队列的三要素:
- 生产者(producer)
- 消费者(consumer)
- 消息服务(broker)

发布:

订阅:

如何实现
(以命令行模拟实现)
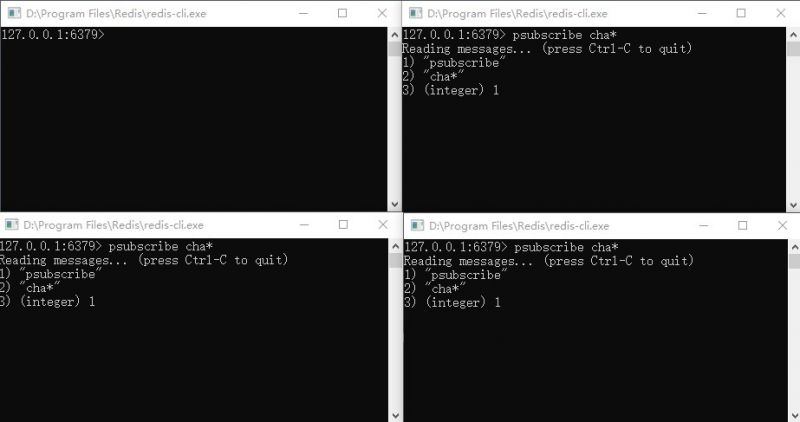
- 开启4个redis客户端(“./redis-cli”),如上图,3个客户端作为消息订阅者,1个为消息发布者:
- 让3个消息订阅者订阅某个频道主题:“subscribe channelTest”;(命令:“subscribe channel [channel ...]”)
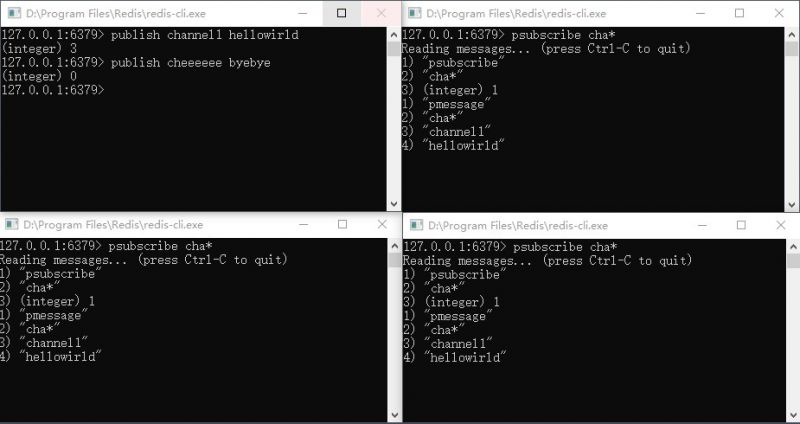
- 让1个消息发布者向频道主题上发布消息:“publish channelTest message123”;(命令“publish channel message”)


- 如果是订阅匹配模式的频道主题:“psubscribe chan*”(表示匹配以chan开头的频道主题,命令“ psubscribe pattern [pattern ...]”);
- 订阅:
- 发布:


事务
什么是事务
事务:是指一系列操作步骤,要么完全地执行,要么完全地不执行。
Redis中的事务(transaction)是一组命令的集合,至少是两个或两个以上的命令,redis事务保证这些命令被执行时中间不会被任何其他操作打断。
示例:微博中,A用户关注了B用户,那么A的关注人列表里面就会有B用户,B的粉丝列表里面就会有A用户。
- 这个关注与被关注的过程是由一系列操作步骤构成:
- A用户添加到B的粉丝列表里面;
- B用户添加到A的关注列表里面;
这两个步骤必须全部执行成功,整个逻辑才是正确的,否则就会产生数据的错误,比如A用户的关注列表有B用户,但B的粉丝列表里没有A用户;
redis事务控制
- 正常情况
- MULTI:用MULTI命令告诉Redis,接下来要执行的命令你先不要执行,而是把它们暂时存起来 (开启事务)
- SADD "user1" 2:第一条命令进入等待队列(命令入队)
- SADD "user2" 1:第二条命令进入等待队列(命令入队)
- EXEC:告知redis执行前面发送的两条命令(提交事务)
- 异常情况
- MULTI:正常命令
- SET key value:正常命令
- SET key:命令语法错误
- EXEC:无法执行事务,那么第一条正确的命令也不会执行,所以key的值不会设置成功
- 例外情况
- MULTI:正常命令
- SET key v1:正常命令
- INCR key:此命令错误,字符串不能自增
- EXEC:
- 事务依然提交了,key的值被设置为v1,自增操作执行失败,但整个事务没有回滚
- 可以放弃事务:discard
- 放弃情况
- MULTI:开启事务
- SET age 25:命令入队
- SET age 30:命令入队
- DISCARD:放弃事务,则命令队列不会被执行
redis事务复杂情况实现
悲观锁
悲观锁(Pessimistic Lock):每次去拿数据的时候都认为别人会修改该数据,所以每次在拿数据的时候都会先上锁,这样别人想拿这个数据就会block阻塞直到它拿到锁。传统的关系型数据库里边就用到了很多这种锁机制,比如行锁,表锁等,读锁,写锁等,都是在做操作之前先上锁,让别人无法操作该数据。
乐观锁
乐观锁(Optimistic Lock):每次去取数据的时候都认为别人不会修改该数据,所以不会上锁,但是在更新的时候会判断一下在此期间别人有没有去更新这条数据,一般使用版本号机制进行判断。乐观锁适用于多读的应用类型,这样可以提高吞吐量。
- 乐观锁大多数情况是基于数据版本号(version)的机制实现的:为数据增加一个版本标识,在基于数据库表的版本解决方案中,一般是通过为数据库表添加一个“version”字段来实现读取出数据时,将此版本号一同读出,之后更新时,对此版本号加1。此时,将提交数据的版本号与数据库表对应记录的当前版本号进行比对,如果提交的数据版本号大于数据库表当前版本号,则予以更新,否则认为是过期数据,不予更新。
- 乐观锁实现举例:
- 文件:乐观锁实现举例.png
redis的watch机制实现乐观锁
监视一个(或多个) key ,如果在事务exec执行之前这个(或这些) key 被其他命令所改动,那么事务将被打断。
示例:
- set k1 1:设置k1值为1
- watch k1:监视k1 (当已经开始监控k1,则其他客户端不能修改k1的值)
- set k1 2:设置k1值为2
- multi:开始事务
- set k1 3:修改k值为3
- exec:提交事务,但k1值不会被修改为3,k1的值仍然是2,因为在事务开启之前k1的值被修改了
持久化
数据持久化:即将数据不同的手段做持久性保存。
- 如:放在磁盘(而非内存)就是一种持久化,不会因电脑关闭或重启而丢失数据。
Redis的数据存储在内存中,内存是瞬时的,如果linux宕机或重启,又或者Redis崩溃或重启,所有的内存数据都会丢失,为解决这个问题,Redis提供两种机制对数据进行持久化存储,便于发生故障后能迅速恢复数据:
- RDB 方式
- AOF 方式
RDB
Redis Database(RDB),就是在指定的时间间隔内将内存中的数据集快照写入磁盘,数据恢复时将快照文件直接再读到内存。
实现:修改配置文件“redis.conf”即可:
################################ SNAPSHOTTING  ################################
#
# Save the DB on disk:
#
#   save <seconds> <changes>
#
#   Will save the DB if both the given number of seconds and the given
#   number of write operations against the DB occurred.
#
#   In the example below the behaviour will be to save:
#   after 900 sec (15 min) if at least 1 key changed
#   after 300 sec (5 min) if at least 10 keys changed
#   after 60 sec if at least 10000 keys changed
#
#   Note: you can disable saving completely by commenting out all "save" lines.
#
#   It is also possible to remove all the previously configured save
#   points by adding a save directive with a single empty string argument
#   like in the following example:
#
#   save ""

save 900 1
save 300 10
save 60 10000

# By default Redis will stop accepting writes if RDB snapshots are enabled
# (at least one save point) and the latest background save failed.
# This will make the user aware (in a hard way) that data is not persisting
# on disk properly, otherwise chances are that no one will notice and some
# disaster will happen.
#
# If the background saving process will start working again Redis will
# automatically allow writes again.
#
# However if you have setup your proper monitoring of the Redis server
# and persistence, you may want to disable this feature so that Redis will
# continue to work as usual even if there are problems with disk,
# permissions, and so forth.
stop-writes-on-bgsave-error yes

# Compress string objects using LZF when dump .rdb databases?
# For default that's set to 'yes' as it's almost always a win.
# If you want to save some CPU in the saving child set it to 'no' but
# the dataset will likely be bigger if you have compressible values or keys.
rdbcompression yes

# Since version 5 of RDB a CRC64 checksum is placed at the end of the file.
# This makes the format more resistant to corruption but there is a performance
# hit to pay (around 10%) when saving and loading RDB files, so you can disable it
# for maximum performances.
#
# RDB files created with checksum disabled have a checksum of zero that will
# tell the loading code to skip the check.
rdbchecksum yes

# The filename where to dump the DB
dbfilename dump.rdb

# The working directory.
#
# The DB will be written inside this directory, with the filename specified
# above using the 'dbfilename' configuration directive.
#
# The Append Only File will also be created inside this directory.
#
# Note that you must specify a directory here, not a file name.
dir ./
- “save <seconds> <changes>”:设置持久化条件“在<seconds>秒内,修改了<changes>次,则进行一次磁盘持久化”;(如上配置,可以多个组合使用)
- “dbfilename”:设置RDB的文件名,默认文件名为“dump.rdb”;
- “dir”:指定RDB和AOF文件的目录
特点:
- 优点:由于存储的是数据快照文件,恢复数据很方便,也比较快;
- 缺点:会丢失最后一次快照以后更改的数据;
- 由于需要经常操作磁盘,RDB 会经常 fork 出一个子进程:如果redis数据库很大,Fork 占用比较多的时间,并且可能会影响 Redis 暂停服务一段时间(millisecond 级别)。
AOF
Append-only File(AOF),Redis每次接收到一条改变数据的命令时,它将把该命令写到一个AOF文件中(只记录写操作,读操作不记录),当Redis重启时,它通过执行AOF文件中所有的命令来恢复数据。
实现:修改配置文件“redis.conf”即可:
############################## APPEND ONLY MODE ###############################

# By default Redis asynchronously dumps the dataset on disk. This mode is
# good enough in many applications, but an issue with the Redis process or
# a power outage may result into a few minutes of writes lost (depending on
# the configured save points).
#
# The Append Only File is an alternative persistence mode that provides
# much better durability. For instance using the default data fsync policy
# (see later in the config file) Redis can lose just one second of writes in a
# dramatic event like a server power outage, or a single write if something
# wrong with the Redis process itself happens, but the operating system is
# still running correctly.
#
# AOF and RDB persistence can be enabled at the same time without problems.
# If the AOF is enabled on startup Redis will load the AOF, that is the file
# with the better durability guarantees.
#
# Please check http://redis.io/topics/persistence for more information.

appendonly no

# The name of the append only file (default: "appendonly.aof")
appendfilename "appendonly.aof"

# The fsync() call tells the Operating System to actually write data on disk
# instead of waiting for more data in the output buffer. Some OS will really flush
# data on disk, some other OS will just try to do it ASAP.
#
# Redis supports three different modes:
#
# no: don't fsync, just let the OS flush the data when it wants. Faster.
# always: fsync after every write to the append only log. Slow, Safest.
# everysec: fsync only one time every second. Compromise.
#
# The default is "everysec", as that's usually the right compromise between
# speed and data safety. It's up to you to understand if you can relax this to
# "no" that will let the operating system flush the output buffer when
# it wants, for better performances (but if you can live with the idea of
# some data loss consider the default persistence mode that's snapshotting),
# or on the contrary, use "always" that's very slow but a bit safer than
# everysec.
#
# More details please check the following article:
# http://antirez.com/post/redis-persistence-demystified.html
#
# If unsure, use "everysec".

# appendfsync always
appendfsync everysec
# appendfsync no

# When the AOF fsync policy is set to always or everysec, and a background
# saving process (a background save or AOF log background rewriting) is
# performing a lot of I/O against the disk, in some Linux configurations
# Redis may block too long on the fsync() call. Note that there is no fix for
# this currently, as even performing fsync in a different thread will block
# our synchronous write(2) call.
#
# In order to mitigate this problem it's possible to use the following option
# that will prevent fsync() from being called in the main process while a
# BGSAVE or BGREWRITEAOF is in progress.
#
# This means that while another child is saving, the durability of Redis is
# the same as "appendfsync none". In practical terms, this means that it is
# possible to lose up to 30 seconds of log in the worst scenario (with the
# default Linux settings).
#
# If you have latency problems turn this to "yes". Otherwise leave it as
# "no" that is the safest pick from the point of view of durability.
no-appendfsync-on-rewrite no

# Automatic rewrite of the append only file.
# Redis is able to automatically rewrite the log file implicitly calling
# BGREWRITEAOF when the AOF log size grows by the specified percentage.
#
# This is how it works: Redis remembers the size of the AOF file after the
# latest rewrite (if no rewrite has happened since the restart, the size of
# the AOF at startup is used).
#
# This base size is compared to the current size. If the current size is
# bigger than the specified percentage, the rewrite is triggered. Also
# you need to specify a minimal size for the AOF file to be rewritten, this
# is useful to avoid rewriting the AOF file even if the percentage increase
# is reached but it is still pretty small.
#
# Specify a percentage of zero in order to disable the automatic AOF
# rewrite feature.

auto-aof-rewrite-percentage 100
auto-aof-rewrite-min-size 64mb

# An AOF file may be found to be truncated at the end during the Redis
# startup process, when the AOF data gets loaded back into memory.
# This may happen when the system where Redis is running
# crashes, especially when an ext4 filesystem is mounted without the
# data=ordered option (however this can't happen when Redis itself
# crashes or aborts but the operating system still works correctly).
#
# Redis can either exit with an error when this happens, or load as much
# data as possible (the default now) and start if the AOF file is found
# to be truncated at the end. The following option controls this behavior.
#
# If aof-load-truncated is set to yes, a truncated AOF file is loaded and
# the Redis server starts emitting a log to inform the user of the event.
# Otherwise if the option is set to no, the server aborts with an error
# and refuses to start. When the option is set to no, the user requires
# to fix the AOF file using the "redis-check-aof" utility before to restart
# the server.
#
# Note that if the AOF file will be found to be corrupted in the middle
# the server will still exit with an error. This option only applies when
# Redis will try to read more data from the AOF file but not enough bytes
# will be found.
aof-load-truncated yes
- “appendonly”:(默认no)启用/关闭aof持久化;
- “appendfilename”:指定AOF文件名,默认文件名为“appendonly.aof”
- “appendfsync”:配置向aof文件写命令数据的策略:
- “no”:不主动进行同步操作,而是完全交由操作系统来做(即每30秒一次),比较快但不是很安全;
- “always”:每次执行写入都会执行同步,慢一些但是比较安全;
- “everysec”:每秒执行一次同步操作,比较平衡,介于速度和安全之间;(默认)
- “auto-aof-rewrite-percentage”:当目前aof文件大小超过上一次重写时的aof文件大小的百分之多少时会再次进行重写(如果之前没有重写,则以启动时的aof文件大小为依据);
- aof文件的重写就是对文件内容的整理,将一些命令进行优化,从而可以让文件体积变小;
- 比如 set k1 v1, 然后又set k1 v2,那么重写后就只会留下set k1 v2,前一个set k1 v1会被删除,因为没有作用。
- aof文件的重写就是对文件内容的整理,将一些命令进行优化,从而可以让文件体积变小;
- “auto-aof-rewrite-min-size”:允许重写的最小AOF文件大小;(一般配置较大,几个G)
- “dir”:(公用RDB配置的“dir”配置)指定RDB和AOF文件的目录;
总结:
- append-only 文件是另一个可以提供完全数据保障的方案;
- AOF 文件会在操作过程中变得越来越大。比如,如果你做一百次加法计算,最后你只会在数据库里面得到最终的数值,但是在你的 AOF 里面会存在 100 次记录,其中 99 条记录对最终的结果是无用的;
- 但 Redis 支持在不影响服务的前提下在后台重构 AOF 文件,让文件得以整理变小;
- 可以同时使用这两种方式,redis默认优先加载aof文件;
集群
持久化功能,用于保证了即使在服务器重启的情况下也不会丢失(或少量丢失)数据。
而集群,是为了避免单点故障:
- 将数据复制多份部署在多台不同的服务器上,即使有一台服务器出现故障其他服务器依然可以继续提供服务。
那么这就要求当一台服务器上的数据更新后,自动将更新的数据同步到其他服务器上。
主从复制(master/slave)
为多个Redis服务器设置主从关系(“一主多从”):通过Redis提供的复制(replication)功能来自动实现多台redis服务器的数据同步;
- redis默认“master”用于写,“slave”用于读,向slave写数据会导致错误;
- 一个master可以有多个slave:
- slave下线,读请求的处理性能下降;
- master下线,写请求无法执行;

实现
有两种方式实现主从配置:
- 修改配置文件:启动时,服务器读取配置文件,并自动成为指定服务器的从服务器,从而构成主从复制的关系;
# 主服务器(master)
include /usr/local/redis-3.2.9/redis.conf
daemonize yes
port 6382
pidfile /var/run/redis_6382.pid
logfile 6382.log
dbfilename dump6382.rdb


# 从服务器(slave)
include /usr/local/redis-3.2.9/redis.conf
daemonize yes
port 6382
pidfile /var/run/redis_6382.pid
logfile 6382.log
dbfilename dump6382.rdb
slaveof 127.0.0.1 6380
- 启动命令:在启动redis时指定当前服务成为某个主Redis服务的从Slave;
./redis-server --slaveof <master-ip> <master-port>
- 进入客户端需指定端口:“./redis-cli -p 6380”;
- 不配置启动默认都是主master;
- “info replication”查看redis服务器所处角色;

容灾
当Master服务出现故障,需手动将slave中的一个提升为master, 剩下的slave挂至新的master上(冷处理):
- “slaveof no one”:将一台slave服务器提升为Master(提升某slave为master)
- “slaveof 127.0.0.1 6381”:将其他从服务器挂到新的主服务器上(将slave挂至新的master上)
- 主从复制模式的故障转移需要手动操作,要实现自动化处理,这就需要“Sentinel哨兵”,实现故障自动转移;
高可用Sentinel哨兵
Sentinel哨兵,是redis官方提供的高可用方案,可以用它来监控多个Redis服务实例的运行情况。
- 仍然使用主从复制,解决读请求的分担,从节点下线,会使得读请求能力有所下降,Master下线,写请求无法执行;
- Sentinel会在Master下线后自动执行故障转移操作,提升一台Slave为Master,并让其它Slave成为新Master的Slave;
关于“监控”:
- Sentinel会不断检查 Master和 Slave是否正常;
- 如果 Sentinel挂了,就无法监控,所以需要多个哨兵,组成 Sentinel网络:
- 监控同一个Master的Sentinel会自动连接,组成一个分布式的Sentinel网络,互相通信并交换彼此关于被监控服务器的信息;
- 当一个Sentinel认为被监控的服务器已经下线时,它会向网络中的其它Sentinel进行确认,判断该服务器是否真的已经下线;
- 如果主服务器下线,则Sentinel网络进行自动故障转移:通过将下线主服务器的某个从服务器提升为新的主服务器,并让其从服务器转移到新的主服务器下,以此来让系统重新回到正常状态;
- 下线的旧主服务器重新上线,Sentinel会让它成为从,挂到新的主服务器下;
实现
配置“Sentinel”:
修改“sentinel.conf”文件,设置哨兵监视主redis服务器:
- 修改 Sentinel端口:
port 26379
- 设置主redis监控:
Sentinel monitor <name> <masterIP> <masterPort> <Quorum投票数>
- Sentinel 会根据Master的配置自动发现 Master的 Slave;
- Sentinel 默认端口号为 26379;
- “<Quorum投票数>”:Sentinel网络中的哨兵投票,(超过半数则)确认redis服务器已下线;
启动“Sentinel”:
redis安装时make编译后就产生了“redis-sentinel”程序文件,使用它可以在一个redis中运行多个sentinel实例;
./redis-sentinel ../sentinel26379.conf
安全
设置密码
设置redis密码,在“redis.conf”文件配置:
requirepass 123456
- 客户端连接则需要密码:“AUTH 123456”或者“redis-cli -h 127.0.0.1 -p 6379 -a 123456”;
- 因为redis 速度相当快,所以在一台比较好的服务器下,一个外部的用户可以在一秒钟进行150K 次的密码尝试,这意味着你需要指定非常非常强大的密码来防止暴力破解。
绑定ip
把“redis.conf”配置中的ip绑定注释取消,修改“127.0.0.1”为允许访问redis服务器的ip地址:
# bind 127.0.0.1
命令禁止或重命名
在“redis.conf”文件中进行命令禁止或重命名配置:
rename-command FLUSHALL oyfekmjvmwxq5a9c8usofuo369x0it2k        #重命名FLUSHALL命令
rename-command FLUSHALL ""                                      # 禁用FLUSHALL命令
rename-command FLUSHDB ""                                       #禁止FLUSHDB命令
rename-command CONFIG b840fc02d524045429941cc15f59e41cb7be6c52  # 重命名CONFIG命令
rename-command CONFIG ""                                        #禁止CONFIG命令
- 对于禁用“FLUSHALL”命令,需要保证“appendonly.aof”文件没有flushall命令,否则服务器无法启动;
修改默认端口
“redis.conf”中修改指定的端口(可随意):
port 6379
- 修改redis的端口,这一点很重要,使用默认的端口很危险;