Nexus3:使用
跳到导航
跳到搜索
关于
初始使用
第一次使用 Nexus 3 需要进行一点配置,才能更好地使用它:
- 添加存储位置配置:
- 添加仓库:(可以为不同的仓库选择不同的存储位置)
- 添加代理(proxy)仓库;
- (应添加“Mavne - Publish Maven Indexer files”类型的任务,以更新其索引)
- 添加宿主(hosted)仓库;
- (应设置其为“Allowed redeploy”)
- 添加仓库组(group);
- (应为其添加不同的仓库成员)


代理仓库:添加任务更新远程索引
代理仓库状态:

- “Online - Remote Available”:可用;
- “Online - Ready to Connect”:不可用;
如图:
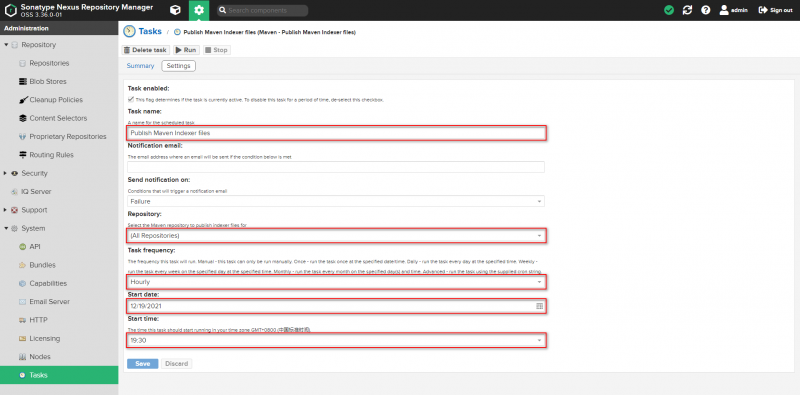
- 如此,更新远程索引之后,才能确保代理仓库的状态可用。

宿主仓库:设置可重复部署
如图:

仓库组:添加仓库成员
如图:

- 需注意成员仓库的顺序:“建议将‘宿主仓库’置于‘代理仓库’之前。(使用时:先查找‘宿主仓库’再查找‘代理仓库’)”
网络代理
有时候局域网是不能直接访问网络的,需要通过防火墙代理来上网,这个时候就需要在 Nexus 里配置代理来访问中央仓库和索引文件了。
如图:

在 Maven 中使用 Nexus
项目配置
pom.xml 示例:(展开/隐藏)
...
	<repositories>
		<repository>
			<id>maven-public</id>
			<url>http://localhost:8080/repository/maven-public/</url>
			<releases>
				<enabled>true</enabled>
			</releases>
			<snapshots>
				<enabled>true</enabled>
			</snapshots>
		</repository>
	</repositories>
...
	<distributionManagement>
		<repository>
			<id>nexus3</id>
			<name>Nexus Release Repository</name>
			<url>http://localhost:8080/repository/maven-releases/</url>
		</repository>
		<snapshotRepository>
			<id>nexus3</id>
			<name>Nexus Snapshot Repository</name>
			<url>http://localhost:8080/repository/maven-snapshots/</url>
		</snapshotRepository>
	</distributionManagement>
...
- <repositories> 用于依赖下载;
- <distributionManagement> 用于部署上传;
- <id> 必须与 setting.xml 中 <server> 下 <id> 一致;
全局配置
settings.xml 示例:(展开/隐藏)
<?xml version="1.0" encoding="UTF-8"?>

<settings xmlns="http://maven.apache.org/SETTINGS/1.2.0"
          xmlns:xsi="http://www.w3.org/2001/XMLSchema-instance"
          xsi:schemaLocation="http://maven.apache.org/SETTINGS/1.2.0 https://maven.apache.org/xsd/settings-1.2.0.xsd">
	<!-- localRepository
	| The path to the local repository maven will use to store artifacts.
	|
	| Default: ${user.home}/.m2/repository
	<localRepository>/path/to/local/repo</localRepository>
	-->
	<localRepository>D:\Documents\Repository</localRepository>

	<!-- interactiveMode
	| This will determine whether maven prompts you when it needs input. If set to false,
	| maven will use a sensible default value, perhaps based on some other setting, for
	| the parameter in question.
	|
	| Default: true
	<interactiveMode>true</interactiveMode>
	-->

	<!-- offline
	| Determines whether maven should attempt to connect to the network when executing a build.
	| This will have an effect on artifact downloads, artifact deployment, and others.
	|
	| Default: false
	<offline>false</offline>
	-->

	<pluginGroups>
		<!-- pluginGroup
		 | Specifies a further group identifier to use for plugin lookup.
		<pluginGroup>com.your.plugins</pluginGroup>
		-->
	</pluginGroups>

	<proxies>
		<!-- proxy
		 | Specification for one proxy, to be used in connecting to the network.
		 |
		<proxy>
		  <id>optional</id>
		  <active>true</active>
		  <protocol>http</protocol>
		  <username>proxyuser</username>
		  <password>proxypass</password>
		  <host>proxy.host.net</host>
		  <port>80</port>
		  <nonProxyHosts>local.net|some.host.com</nonProxyHosts>
		</proxy>
		-->
	</proxies>

	<servers>
		<server>
		  <id>nexus3</id>
		  <username>admin</username>
		  <password>@eijux</password>
		</server>

		<!-- Another sample, using keys to authenticate.
		<server>
		  <id>siteServer</id>
		  <privateKey>/path/to/private/key</privateKey>
		  <passphrase>optional; leave empty if not used.</passphrase>
		</server>
		-->
	</servers>

	<mirrors>
		<mirror>
			<id>nexus3</id>
			<name>nexus3</name>
			<mirrorOf>*</mirrorOf>
			<url>http://localhost:8080/repository/maven-public/</url>
		</mirror>
	</mirrors>

	<profiles>
		<profile>
			<id>dev</id>

			<repositories>
				<repository>
					<id>maven-public</id>
					<name>maven-public</name>
					<url>http://localhost:8080/repository/maven-public/</url>
					<releases>
						<enabled>true</enabled>
					</releases>
					<snapshots>
						<enabled>true</enabled>
					</snapshots>
				</repository>
			</repositories>

			<pluginRepositories>
				<pluginRepository>
					<id>maven-public</id>
					<name>maven-public</name>
					<url>http://localhost:8080/repository/maven-public/</url>
					<releases>
						<enabled>true</enabled>
					</releases>
					<snapshots>
						<enabled>true</enabled>
					</snapshots>
				</pluginRepository>
			</pluginRepositories>
		</profile>
	</profiles>

	<activeProfiles>
		<activeProfile>dev</activeProfile>
	</activeProfiles>
</settings>
IDEA 中更新 Maven 仓库索引
(先确保 Nexus 3 的仓库状态为“Online - Remote Available”)
如图:
