“Nexus3:使用”的版本间差异
跳到导航
跳到搜索
(→网络代理) |
|||
| 第41行: | 第41行: | ||
如图: | 如图: | ||
: [[File:Nexus3:网络代理设置.png|800px]] | : [[File:Nexus3:网络代理设置.png|800px]] | ||
=== 存储清理 === | |||
安装一段时间后发现,“...\Nexus3\sonatype-work\nexus3\blobs\default”路径下的“content”占用太大了。(已经 90 G 了,还是在安装测试后没怎么使用的情况下) | |||
查看 Bolb Store 的情况如下: | |||
: [[File:Nexus3:default blob占用太大.png|800px]] | |||
为此,在网络上查询后,添加了“Admin - Compact blob store”类型的任务: | |||
: [[File:Nexus3:Task“Comact blob store”.png|800px]] | |||
Schedule a Compact Blobstore task to run to remove items from blob storage that have previously been deleted. Many tasks which purge old content from the blobstore mark the content for deletion but do not clean up physical disk space. To remove content from disk you need to run Compact Blobstore. | |||
大概意思是,你需要运行一个“compact blobstore”的任务来清理之前被你删除的 blob 里面的数据,很多清理任务只是把 blob 里面的数据标记被删除了(但磁盘空间并未被释放)。所以,需要执行一个 Compact Blobstore task 来将这些数据占用的空间释放出来。 | |||
== '''在 Maven 中使用 Nexus''' == | == '''在 Maven 中使用 Nexus''' == | ||
2021年12月29日 (三) 01:06的最新版本
关于
初始使用
第一次使用 Nexus 3 需要进行一点配置,才能更好地使用它:
- 添加存储位置配置:
- 添加仓库:(可以为不同的仓库选择不同的存储位置)
- 添加代理(proxy)仓库;
- (应添加“Mavne - Publish Maven Indexer files”类型的任务,以更新其索引)
- 添加宿主(hosted)仓库;
- (应设置其为“Allowed redeploy”)
- 添加仓库组(group);
- (应为其添加不同的仓库成员)


代理仓库:添加任务更新远程索引
代理仓库状态:

- “Online - Remote Available”:可用;
- “Online - Ready to Connect”:不可用;
如图:
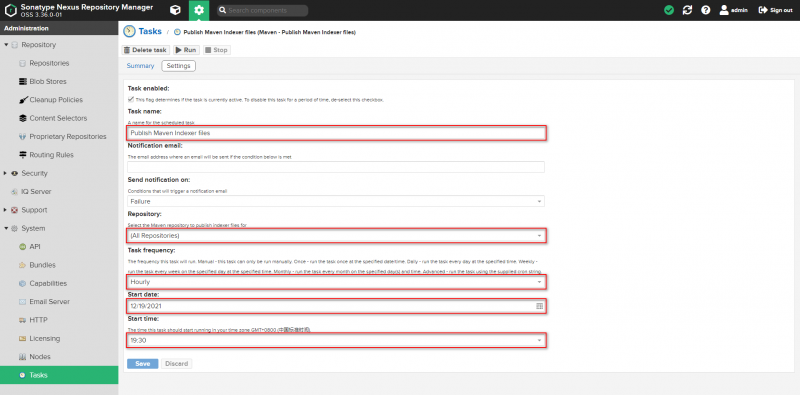
- 如此,更新远程索引之后,才能确保代理仓库的状态可用。

宿主仓库:设置可重复部署
如图:

仓库组:添加仓库成员
如图:

- 需注意成员仓库的顺序:“建议将‘宿主仓库’置于‘代理仓库’之前。(使用时:先查找‘宿主仓库’再查找‘代理仓库’)”
网络代理
有时候局域网是不能直接访问网络的,需要通过防火墙代理来上网,这个时候就需要在 Nexus 里配置代理来访问中央仓库和索引文件了。
如图:

存储清理
安装一段时间后发现,“...\Nexus3\sonatype-work\nexus3\blobs\default”路径下的“content”占用太大了。(已经 90 G 了,还是在安装测试后没怎么使用的情况下)
查看 Bolb Store 的情况如下:

为此,在网络上查询后,添加了“Admin - Compact blob store”类型的任务:

Schedule a Compact Blobstore task to run to remove items from blob storage that have previously been deleted. Many tasks which purge old content from the blobstore mark the content for deletion but do not clean up physical disk space. To remove content from disk you need to run Compact Blobstore.

大概意思是,你需要运行一个“compact blobstore”的任务来清理之前被你删除的 blob 里面的数据,很多清理任务只是把 blob 里面的数据标记被删除了(但磁盘空间并未被释放)。所以,需要执行一个 Compact Blobstore task 来将这些数据占用的空间释放出来。
在 Maven 中使用 Nexus
项目配置
pom.xml 示例:(展开/隐藏)
...
	<repositories>
		<repository>
			<id>maven-public</id>
			<url>http://localhost:8091/repository/maven-public/</url>
			<releases>
				<enabled>true</enabled>
			</releases>
			<snapshots>
				<enabled>true</enabled>
			</snapshots>
		</repository>
	</repositories>
...
	<distributionManagement>
		<repository>
			<id>nexus3</id>
			<name>Nexus Release Repository</name>
			<url>http://localhost:8091/repository/maven-releases/</url>
		</repository>
		<snapshotRepository>
			<id>nexus3</id>
			<name>Nexus Snapshot Repository</name>
			<url>http://localhost:8091/repository/maven-snapshots/</url>
		</snapshotRepository>
	</distributionManagement>
...
- <repositories> 用于依赖下载;
- <distributionManagement> 用于部署上传;
- <id> 必须与 setting.xml 中 <server> 下 <id> 一致;
全局配置
settings.xml 示例:(展开/隐藏)
<?xml version="1.0" encoding="UTF-8"?>

<settings xmlns="http://maven.apache.org/SETTINGS/1.2.0"
          xmlns:xsi="http://www.w3.org/2001/XMLSchema-instance"
          xsi:schemaLocation="http://maven.apache.org/SETTINGS/1.2.0 https://maven.apache.org/xsd/settings-1.2.0.xsd">
	<!-- localRepository
	| The path to the local repository maven will use to store artifacts.
	|
	| Default: ${user.home}/.m2/repository
	<localRepository>/path/to/local/repo</localRepository>
	-->
	<localRepository>D:\Documents\Repository</localRepository>

	<!-- interactiveMode
	| This will determine whether maven prompts you when it needs input. If set to false,
	| maven will use a sensible default value, perhaps based on some other setting, for
	| the parameter in question.
	|
	| Default: true
	<interactiveMode>true</interactiveMode>
	-->

	<!-- offline
	| Determines whether maven should attempt to connect to the network when executing a build.
	| This will have an effect on artifact downloads, artifact deployment, and others.
	|
	| Default: false
	<offline>false</offline>
	-->

	<pluginGroups>
		<!-- pluginGroup
		 | Specifies a further group identifier to use for plugin lookup.
		<pluginGroup>com.your.plugins</pluginGroup>
		-->
	</pluginGroups>

	<proxies>
		<!-- proxy
		 | Specification for one proxy, to be used in connecting to the network.
		 |
		<proxy>
		  <id>optional</id>
		  <active>true</active>
		  <protocol>http</protocol>
		  <username>proxyuser</username>
		  <password>proxypass</password>
		  <host>proxy.host.net</host>
		  <port>80</port>
		  <nonProxyHosts>local.net|some.host.com</nonProxyHosts>
		</proxy>
		-->
	</proxies>

	<servers>
		<server>
		  <id>nexus3</id>
		  <username>admin</username>
		  <password>@eijux</password>
		</server>

		<!-- Another sample, using keys to authenticate.
		<server>
		  <id>siteServer</id>
		  <privateKey>/path/to/private/key</privateKey>
		  <passphrase>optional; leave empty if not used.</passphrase>
		</server>
		-->
	</servers>

	<mirrors>
		<mirror>
			<id>nexus3</id>
			<name>nexus3</name>
			<mirrorOf>*</mirrorOf>
			<url>http://localhost:8091/repository/maven-public/</url>
		</mirror>
	</mirrors>

	<profiles>
		<profile>
			<id>dev</id>

			<repositories>
				<repository>
					<id>maven-public</id>
					<name>maven-public</name>
					<url>http://localhost:8091/repository/maven-public/</url>
					<releases>
						<enabled>true</enabled>
					</releases>
					<snapshots>
						<enabled>true</enabled>
					</snapshots>
				</repository>
			</repositories>

			<pluginRepositories>
				<pluginRepository>
					<id>maven-public</id>
					<name>maven-public</name>
					<url>http://localhost:8091/repository/maven-public/</url>
					<releases>
						<enabled>true</enabled>
					</releases>
					<snapshots>
						<enabled>true</enabled>
					</snapshots>
				</pluginRepository>
			</pluginRepositories>
		</profile>
	</profiles>

	<activeProfiles>
		<activeProfile>dev</activeProfile>
	</activeProfiles>
</settings>
IDEA 中更新 Maven 仓库索引
(先确保 Nexus 3 的仓库状态为“Online - Remote Available”)
如图:
