“Spring:JdbcTemplate、事务”的版本间差异
跳到导航
跳到搜索
无编辑摘要 |
小 (Eijux移动页面Spring:jdbcTemplate、事务至Spring:JdbcTemplate、事务,不留重定向) |
||
| (未显示同一用户的21个中间版本) | |||
| 第1行: | 第1行: | ||
[[category:SpringFramework]] | [[category:SpringFramework]] | ||
== 关于 == | |||
Spring 对不同的持久化层技术都进行了封装: | |||
:[[File:spring的dao模板类.png|600px]] | |||
:* '''JdbcTemplate''' 对 JDBC 进行了封装; | |||
=== jar包 === | |||
[[File:spring-JDBCTemplate相关jar包.jpg|300px]] | |||
:* 数据库驱动包; | |||
:* JDBC 包; | |||
:* 事务包 | |||
=== JDBC 模板的基本使用 === | |||
<syntaxhighlight lang="java" highlight="3,9"> | |||
@Test | |||
public void demo1(){ | |||
DriverManagerDataSource dataSource = new DriverManagerDataSource(); | |||
dataSource.setDriverClassName("com.mysql.jdbc.Driver"); | |||
dataSource.setUrl("jdbc:mysql:///spring_day03"); | |||
dataSource.setUsername("root"); | |||
dataSource.setPassword("123"); | |||
JdbcTemplate jdbcTemplate = new JdbcTemplate(dataSource); | |||
jdbcTemplate.update("insert into account values (null,?,?)", " 会希",10000d); | |||
} | |||
</syntaxhighlight> | |||
== 连接池 == | |||
数据库连接池(Connection pooling):程序启动时建立足够的数据库连接,并将这些连接组成一个连接池,由程序动态地对池中的连接进行申请、使用、释放。<br/> | |||
连接池的机制: | |||
# 程序初始化时创建连接池; | |||
# 使用时向连接池申请可用连接; | |||
# 使用完毕,将连接返还给连接池; | |||
# 程序退出时,断开所有连接,并释放资源; | |||
其中: | |||
# 最小连接数:连接池一直保持的数据库连接; | |||
# 最大连接数:连接池能申请的最大连接数: | |||
#: 如果数据库连接请求超过最大次数,后到的请求将被加入等待队列; | |||
=== Spring 内置连接池 === | |||
“org.springframework.jdbc.datasource.'''DriverManagerDataSource'''”: | |||
# 配置内置连接池: | |||
#: <syntaxhighlight lang="properties"> | |||
<!-- 配置Spring 的内置连接池--> | |||
<bean id="dataSource" class="org.springframework.jdbc.datasource.DriverManagerDataSource"> | |||
<property name="driverClassName" value="com.mysql.jdbc.Driver"/> | |||
<property name="url" value="jdbc:mysql:///spring_day02"/> | |||
<property name="username" value="root"/> | |||
<property name="password" value="123"/> | |||
</bean> | |||
</syntaxhighlight> | |||
# 配置jdbcTemplate模板: | |||
#: <syntaxhighlight lang="properties"> | |||
<!-- 配置JDBC 模板--> | |||
<bean id="jdbcTemplate" class="org.springframework.jdbc.core.JdbcTemplate"> | |||
<property name="dataSource" ref="dataSource"/> | |||
</bean> | |||
</syntaxhighlight> | |||
# 编写测试类: | |||
#* 注入 jdbcTemplate; | |||
#: <syntaxhighlight lang="java"> | |||
@RunWith(SpringJUnit4ClassRunner.class) | |||
@ContextConfiguration("classpath:applicationContext.xml") | |||
public class SpringDemo2 { | |||
@Resource(name="jdbcTemplate") | |||
private JdbcTemplate jdbcTemplate; | |||
@Test | |||
public void demo1(){ | |||
jdbcTemplate.update("insert into account values (null,?,?)", "eijux",10000d); | |||
} | |||
} | |||
</syntaxhighlight> | |||
=== DBCP 连接池 === | |||
# 引入dbcp 连接池的jar 包: | |||
#: [[File:dbcp 连接池的jar 包.jpg|400px]] | |||
# 配置连接池: | |||
#:<syntaxhighlight lang="properties"> | |||
<!-- 配置DBCP 连接池--> | |||
<bean id="dataSource" class="org.apache.commons.dbcp.BasicDataSource"> | |||
<property name="driverClassName" value="com.mysql.jdbc.Driver"/> | |||
<property name="url" value="jdbc:mysql:///spring_day02"/> | |||
<property name="username" value="root"/> | |||
<property name="password" value="123"/> | |||
</bean> | |||
</syntaxhighlight> | |||
=== c3p0 连接池 === | |||
# 引入相应的jar 包: | |||
#: [[File:c3p0 连接池的jar 包.jpg|400px]] | |||
# 配置连接池: | |||
#:<syntaxhighlight lang="properties"> | |||
<!-- 配置C3P0 连接池--> | |||
<bean id="dataSource" class="com.mchange.v2.c3p0.ComboPooledDataSource"> | |||
<property name="driverClass" value="com.mysql.jdbc.Driver"/> | |||
<property name="jdbcUrl" value="jdbc:mysql:///spring_day02"/> | |||
<property name="user" value="root"/> | |||
<property name="password" value="123"/> | |||
</bean> | |||
</syntaxhighlight> | |||
== 使用属性文件 == | |||
定义属性文件“jdbc.properties”: | |||
<syntaxhighlight lang="properties"> | |||
jdbc.driverClass=com.mysql.jdbc.Driver | |||
jdbc.url=jdbc:mysql:///spring_day02 | |||
jdbc.username=root | |||
jdbc.password=123 | |||
</syntaxhighlight> | |||
引入外部的属性文件:(两种方式) | |||
# 第一种方式: | |||
#:<syntaxhighlight lang="properties"> | |||
<bean class="org.springframework.beans.factory.config.PropertyPlaceholderConfigurer"> | |||
<property name="location" value="classpath:jdbc.properties"/> | |||
</bean> | |||
</syntaxhighlight> | |||
# 第二种方式: | |||
#:<syntaxhighlight lang="properties"> | |||
<context:property-placeholder location="classpath:jdbc.properties"/> | |||
</syntaxhighlight> | |||
== jdbcTemplate == | == jdbcTemplate == | ||
JDBC 模板CRUD 的操作: | |||
* JdbcTemplate类使用“org.springframework.jdbc.core.'''RowMapper<T>'''”接口进行结果映射:将结果集ResultSet的行,映射到实际的结果对象。 | |||
<syntaxhighlight lang="java" highlight="5-6,11,26,32,38,41-45"> | |||
@RunWith(SpringJUnit4ClassRunner.class) | |||
@ContextConfiguration("classpath:applicationContext.xml") | |||
public class SpringDemo3 { | |||
@Resource(name="jdbcTemplate") | |||
private JdbcTemplate jdbcTemplate; | |||
@Test | |||
// 插入操作 | |||
public void demo1() { | |||
jdbcTemplate.update("insert into account values (null,?,?)", "冠希",10000d); | |||
} | |||
@Test | |||
// 修改操作 | |||
public void demo2() { | |||
jdbcTemplate.update("update account set name=?,money =? where id = ?", "思雨",10000d,5); | |||
} | |||
@Test | |||
// 删除操作 | |||
public void demo3() { | |||
jdbcTemplate.update("delete from account where id = ?", 5); | |||
} | |||
@Test | |||
// 查询一条记录 | |||
public void demo4() { | |||
Account account = jdbcTemplate.queryForObject("select * from account where id = ?", new MyRowMapper(), 1); | |||
System.out.println(account); | |||
} | |||
@Test | |||
// 查询所有记录 | |||
public void demo5() { | |||
List<Account> list = jdbcTemplate.query("select * from account", new MyRowMapper()); | |||
for (Account account : list) { | |||
System.out.println(account); | |||
} | |||
} | |||
class MyRowMapper implements RowMapper<Account> { | |||
@Override | |||
public Account mapRow(ResultSet rs, int rowNum) throws SQLException { | |||
Account account = new Account(); | |||
account.setId(rs.getInt("id")); | |||
account.setName(rs.getString("name")); | |||
account.setMoney(rs.getDouble("money")); | |||
return account; | |||
} | |||
} | |||
} | |||
</syntaxhighlight> | |||
# 注入了 jdbcTemplate; | |||
# 使用 jdbcTemplate进入db操作; | |||
# 使用 RowMapper进行结果集映射; | |||
== 事务 == | |||
=== 关于事务 === | |||
事务:逻辑上的一组操作,组成这组操作的各个逻辑单元,要么一起成功,要么一起失败。 | |||
spring事务管理两种方式: | |||
# 编程式事务管理(不用); | |||
# 声明式事务管理: | |||
## 基于xml配置文件实现; | |||
## 基于注解实现; | |||
==== 事务特性: ==== | |||
# '''原子性''':强调事务的不可分割; | |||
# '''一致性''':事务的执行的前后数据的完整性保持一致; | |||
# '''隔离性''':一个事务执行的过程中,不应该受到其他事务的干扰; | |||
# '''持久性''':事务一旦结束,数据就持久到数据库; | |||
=== Spring事务管理API === | |||
---- | |||
# PlatformTransactionManager:平台事务管理器(真正管理事务的对象); | |||
## “org.springframework.jdbc.datasource.'''DataSourceTransactionManager'''”:使用Spring JDBC或 iBatis进行持久化数据时使用; | |||
## “org.springframework.orm.hibernate3.'''HibernateTransactionManager'''”:使用 Hibernate 版本进行持久化数据时使用; | |||
# TransactionDefinition:事务定义信息 | |||
#: “隔离级别”、“传播行为”、“超时信息”、“是否只读”; | |||
== | * TransactionStatus:事务的状态; | ||
==== 隔离级别 ==== | |||
如果不考虑隔离性引发安全性问题: | |||
# 脏读:一个事务读到了另一个事务的未提交的数据; | |||
# 不可重复读:一个事务读到了另一个事务已经提交的“update”的数据,导致多次查询结果不一致; | |||
# 虚读:一个事务读到了另一个事务已经提交的“insert”的数据,导致多次查询结果不一致; | |||
事务隔离级别: | |||
# 未提交读(“Read_Uncommited”):脏读,不可重复读,虚读都有可能发生。 | |||
# 已提交读(“Read_Commited”):避免脏读。(但是不可重复读和虚读有可能发生) | |||
# 可重复读(“Repeatable_Read”):避免脏读、不可重复读。(但是虚读有可能发生) | |||
# 串行化的(“Serializable”):避免以上所有读问题。 | |||
==== 事务的传播行为 ==== | |||
# 保证同一个事务中: | |||
#* “'''PROPAGATION_REQUIRED'''”:支持当前事务,如果不存在就新建一个(默认); | |||
#* “PROPAGATION_SUPPORTS”:支持当前事务,如果不存在,就不使用事务; | |||
#* “PROPAGATION_MANDATORY”:支持当前事务,如果不存在,抛出异常; | |||
# 保证没有在同一个事务中: | |||
#* “'''PROPAGATION_REQUIRES_NEW'''”:如果有事务存在,挂起当前事务,创建一个新的事务; | |||
#* “PROPAGATION_NOT_SUPPORTED”:以非事务方式运行,如果有事务存在,挂起当前事务; | |||
#* “PROPAGATION_NEVER”:以非事务方式运行,如果有事务存在,抛出异常; | |||
#* “'''PROPAGATION_NESTED'''”:如果当前事务存在,则嵌套事务执行; | |||
=== (编程式 事务管理) === | |||
---- | |||
(了解) | |||
# 配置事务管理器; | |||
# 配置事务管理模板; | |||
# 业务层注入事务管理模板; | |||
#: <syntaxhighlight lang="properties"> | |||
<!-- 配置事务管理器--> | |||
<bean id="transactionManager" class="org.springframework.jdbc.datasource.DataSourceTransactionManager"> | |||
<property name="dataSource" ref="dataSource"/> | |||
</bean> | |||
<!-- 配置事务管理模板--> | |||
<bean id="transactionTemplate" class="org.springframework.transaction.support.TransactionTemplate"> | |||
<property name="transactionManager" ref="transactionManager"/> | |||
</bean> | |||
<!-- 配置业务层的类--> | |||
<bean id="accountService" class="cn.itcast.transaction.demo1.AccountServiceImpl"> | |||
<property name="accountDao" ref="accountDao"/> | |||
<!-- 注入事务管理模板--> | |||
<property name="transactionTemplate" ref="transactionTemplate"/> | |||
</bean> | |||
</syntaxhighlight> | |||
# 手动编写代码实现事务管理: | |||
#* 使用“TransactionTemplate.execute(TransactionCallback<T> action)”方法。如: | |||
#: <syntaxhighlight lang="java"> | |||
public void transfer(final String from, final String to, final Double money) { | |||
transactionTemplate.execute(new TransactionCallbackWithoutResult() { | |||
@Override | |||
protected void doInTransactionWithoutResult(TransactionStatus status) | |||
{ | |||
accountDao.outMoney(from, money); | |||
int d = 1 / 0; | |||
accountDao.inMoney(to, money); | |||
} | |||
}); | |||
} | |||
</syntaxhighlight> | |||
=== 事务管理:xml === | |||
---- | |||
步骤: | |||
# 配置“事务管理器”;(需要配置“DataSource”) | |||
# 配置事务“增强”; | |||
# 配置“切面”; | |||
#: <syntaxhighlight lang="properties"> | |||
<!-- dataSource --> | |||
... | |||
<!-- 第一步 配置事务管理器 --> | |||
<bean id="transactionManager" class="org.springframework.jdbc.datasource.DataSourceTransactionManager"> | |||
<!-- 注入dataSource --> | |||
<property name="dataSource" ref="dataSource"></property> | |||
</bean> | |||
<!-- 第二步 配置事务增强 --> | |||
<tx:advice id="txadvice" transaction-manager="transactionManager"> | |||
<!-- 做事务操作 --> | |||
<tx:attributes> | |||
<!-- 设置进行事务操作的方法匹配规则 --> | |||
<!-- | |||
isolation="DEFAULT" 隔离级别 | |||
propagation="REQUIRED" 传播行为 | |||
read-only="false" 只读 | |||
timeout="-1" 过期时间 | |||
rollback-for="" -Exception | |||
no-rollback-for="" +Exception | |||
--> | |||
<tx:method name="account*" propagation="REQUIRED"/> | |||
<!-- <tx:method name="insert*" /> --> | |||
</tx:attributes> | |||
</tx:advice> | |||
<!-- 第三步 配置切面 --> | |||
<aop:config> | |||
<!-- 切入点 --> | |||
<aop:pointcut expression="execution(* cn.itcast.service.OrdersService.*(..))" id="pointcut1"/> | |||
<!-- 切面 --> | |||
<aop:advisor advice-ref="txadvice" pointcut-ref="pointcut1"/> | |||
</aop:config> | |||
</syntaxhighlight> | |||
=== 事务管理:注解 === | |||
---- | |||
步骤: | |||
# 配置“事务管理器”;(需要配置“DataSource”) | |||
# 开启事务注解; | |||
#: <syntaxhighlight lang="properties"> | |||
<!-- dataSource --> | |||
... | |||
<!-- 第一步配置事务管理器 --> | |||
<bean id="transactionManager" class="org.springframework.jdbc.datasource.DataSourceTransactionManager"> | |||
<property name="dataSource" ref="dataSource"></property> | |||
</bean> | |||
<!-- 第二步 开启事务注解 --> | |||
<tx:annotation-driven transaction-manager="transactionManager"/> | |||
</syntaxhighlight> | |||
# 使用“'''@Transactional'''”注解;(标注Service) | |||
#: <syntaxhighlight lang="java"> | |||
@Transactional | |||
public class OrdersService { | |||
private OrdersDao ordersDao; | |||
public void setOrdersDao(OrdersDao ordersDao) { | |||
this.ordersDao = ordersDao; | |||
} | |||
//调用dao的方法 | |||
//业务逻辑层,写转账业务 | |||
public void accountMoney() { | |||
//小王少1000 | |||
ordersDao.lessMoney(); | |||
//出现异常 | |||
int i = 10/0; | |||
//小马多1000 | |||
ordersDao.moreMoney(); | |||
} | |||
} | |||
</syntaxhighlight> | |||
2022年11月5日 (六) 12:13的最新版本
关于
Spring 对不同的持久化层技术都进行了封装:
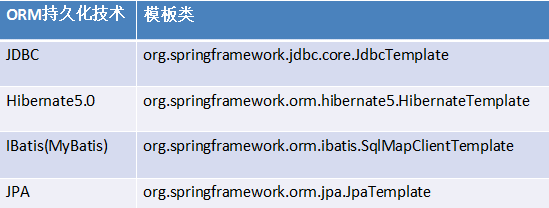
- JdbcTemplate 对 JDBC 进行了封装;

jar包

- 数据库驱动包;
- JDBC 包;
- 事务包
JDBC 模板的基本使用
@Test
public void demo1(){
   DriverManagerDataSource dataSource = new DriverManagerDataSource();
   dataSource.setDriverClassName("com.mysql.jdbc.Driver");
   dataSource.setUrl("jdbc:mysql:///spring_day03");
   dataSource.setUsername("root");
   dataSource.setPassword("123");

   JdbcTemplate jdbcTemplate = new JdbcTemplate(dataSource);
   jdbcTemplate.update("insert into account values (null,?,?)", " 会希",10000d);
}
连接池
数据库连接池(Connection pooling):程序启动时建立足够的数据库连接,并将这些连接组成一个连接池,由程序动态地对池中的连接进行申请、使用、释放。
连接池的机制:
- 程序初始化时创建连接池;
- 使用时向连接池申请可用连接;
- 使用完毕,将连接返还给连接池;
- 程序退出时,断开所有连接,并释放资源;
其中:
- 最小连接数:连接池一直保持的数据库连接;
- 最大连接数:连接池能申请的最大连接数:
- 如果数据库连接请求超过最大次数,后到的请求将被加入等待队列;
Spring 内置连接池
“org.springframework.jdbc.datasource.DriverManagerDataSource”:
- 配置内置连接池:
<!-- 配置Spring 的内置连接池-->
<bean id="dataSource" class="org.springframework.jdbc.datasource.DriverManagerDataSource">
   <property name="driverClassName" value="com.mysql.jdbc.Driver"/>
   <property name="url" value="jdbc:mysql:///spring_day02"/>
   <property name="username" value="root"/>
   <property name="password" value="123"/>
</bean>
- 配置jdbcTemplate模板:
<!-- 配置JDBC 模板-->
<bean id="jdbcTemplate" class="org.springframework.jdbc.core.JdbcTemplate">
   <property name="dataSource" ref="dataSource"/>
</bean>
- 编写测试类:
- 注入 jdbcTemplate;
@RunWith(SpringJUnit4ClassRunner.class)
@ContextConfiguration("classpath:applicationContext.xml")
public class SpringDemo2 {
   @Resource(name="jdbcTemplate")
   private JdbcTemplate jdbcTemplate;

   @Test
   public void demo1(){
   jdbcTemplate.update("insert into account values (null,?,?)", "eijux",10000d);
   }
}
DBCP 连接池
- 引入dbcp 连接池的jar 包:
- 配置连接池:
<!-- 配置DBCP 连接池-->
<bean id="dataSource" class="org.apache.commons.dbcp.BasicDataSource">
   <property name="driverClassName" value="com.mysql.jdbc.Driver"/>
   <property name="url" value="jdbc:mysql:///spring_day02"/>
   <property name="username" value="root"/>
   <property name="password" value="123"/>
</bean>

c3p0 连接池
- 引入相应的jar 包:
- 配置连接池:
<!-- 配置C3P0 连接池-->
<bean id="dataSource" class="com.mchange.v2.c3p0.ComboPooledDataSource">
   <property name="driverClass" value="com.mysql.jdbc.Driver"/>
   <property name="jdbcUrl" value="jdbc:mysql:///spring_day02"/>
   <property name="user" value="root"/>
   <property name="password" value="123"/>
</bean>
使用属性文件
定义属性文件“jdbc.properties”:
jdbc.driverClass=com.mysql.jdbc.Driver
jdbc.url=jdbc:mysql:///spring_day02
jdbc.username=root
jdbc.password=123
引入外部的属性文件:(两种方式)
- 第一种方式:
<bean class="org.springframework.beans.factory.config.PropertyPlaceholderConfigurer">
   <property name="location" value="classpath:jdbc.properties"/>
</bean>
- 第二种方式:
<context:property-placeholder location="classpath:jdbc.properties"/>
jdbcTemplate
JDBC 模板CRUD 的操作:
- JdbcTemplate类使用“org.springframework.jdbc.core.RowMapper<T>”接口进行结果映射:将结果集ResultSet的行,映射到实际的结果对象。
@RunWith(SpringJUnit4ClassRunner.class)
@ContextConfiguration("classpath:applicationContext.xml")
public class SpringDemo3 {

	@Resource(name="jdbcTemplate")
	private JdbcTemplate jdbcTemplate;

	@Test
	// 插入操作
	public void demo1() {
		jdbcTemplate.update("insert into account values (null,?,?)", "冠希",10000d);
	}
	@Test
	// 修改操作
	public void demo2() {
		jdbcTemplate.update("update account set name=?,money =? where id = ?", "思雨",10000d,5);
	}
	@Test
	// 删除操作
	public void demo3() {
		jdbcTemplate.update("delete from account where id = ?", 5);
	}
	@Test
	// 查询一条记录
	public void demo4() {
		Account account = jdbcTemplate.queryForObject("select * from account where id = ?", new MyRowMapper(), 1);
		System.out.println(account);
	}
	@Test
	// 查询所有记录
	public void demo5() {
		List<Account> list = jdbcTemplate.query("select * from account", new MyRowMapper());
		for (Account account : list) {
			System.out.println(account);
		}
	}

	class MyRowMapper implements RowMapper<Account> {
		@Override
		public Account mapRow(ResultSet rs, int rowNum) throws SQLException {
			Account account = new Account();
			account.setId(rs.getInt("id"));
			account.setName(rs.getString("name"));
			account.setMoney(rs.getDouble("money"));
			return account;
		}
	}
}
- 注入了 jdbcTemplate;
- 使用 jdbcTemplate进入db操作;
- 使用 RowMapper进行结果集映射;
事务
关于事务
事务:逻辑上的一组操作,组成这组操作的各个逻辑单元,要么一起成功,要么一起失败。
spring事务管理两种方式:
- 编程式事务管理(不用);
- 声明式事务管理:
- 基于xml配置文件实现;
- 基于注解实现;
事务特性:
- 原子性:强调事务的不可分割;
- 一致性:事务的执行的前后数据的完整性保持一致;
- 隔离性:一个事务执行的过程中,不应该受到其他事务的干扰;
- 持久性:事务一旦结束,数据就持久到数据库;
Spring事务管理API
- PlatformTransactionManager:平台事务管理器(真正管理事务的对象);
- “org.springframework.jdbc.datasource.DataSourceTransactionManager”:使用Spring JDBC或 iBatis进行持久化数据时使用;
- “org.springframework.orm.hibernate3.HibernateTransactionManager”:使用 Hibernate 版本进行持久化数据时使用;
- TransactionDefinition:事务定义信息
- “隔离级别”、“传播行为”、“超时信息”、“是否只读”;
- TransactionStatus:事务的状态;
隔离级别
如果不考虑隔离性引发安全性问题:
- 脏读:一个事务读到了另一个事务的未提交的数据;
- 不可重复读:一个事务读到了另一个事务已经提交的“update”的数据,导致多次查询结果不一致;
- 虚读:一个事务读到了另一个事务已经提交的“insert”的数据,导致多次查询结果不一致;
事务隔离级别:
- 未提交读(“Read_Uncommited”):脏读,不可重复读,虚读都有可能发生。
- 已提交读(“Read_Commited”):避免脏读。(但是不可重复读和虚读有可能发生)
- 可重复读(“Repeatable_Read”):避免脏读、不可重复读。(但是虚读有可能发生)
- 串行化的(“Serializable”):避免以上所有读问题。
事务的传播行为
- 保证同一个事务中:
- “PROPAGATION_REQUIRED”:支持当前事务,如果不存在就新建一个(默认);
- “PROPAGATION_SUPPORTS”:支持当前事务,如果不存在,就不使用事务;
- “PROPAGATION_MANDATORY”:支持当前事务,如果不存在,抛出异常;
- 保证没有在同一个事务中:
- “PROPAGATION_REQUIRES_NEW”:如果有事务存在,挂起当前事务,创建一个新的事务;
- “PROPAGATION_NOT_SUPPORTED”:以非事务方式运行,如果有事务存在,挂起当前事务;
- “PROPAGATION_NEVER”:以非事务方式运行,如果有事务存在,抛出异常;
- “PROPAGATION_NESTED”:如果当前事务存在,则嵌套事务执行;
(编程式 事务管理)
(了解)
- 配置事务管理器;
- 配置事务管理模板;
- 业务层注入事务管理模板;
   <!-- 配置事务管理器-->
   <bean id="transactionManager" class="org.springframework.jdbc.datasource.DataSourceTransactionManager">
      <property name="dataSource" ref="dataSource"/>
   </bean>

   <!-- 配置事务管理模板-->
   <bean id="transactionTemplate" class="org.springframework.transaction.support.TransactionTemplate">
      <property name="transactionManager" ref="transactionManager"/>
   </bean>

   <!-- 配置业务层的类-->
   <bean id="accountService" class="cn.itcast.transaction.demo1.AccountServiceImpl">
      <property name="accountDao" ref="accountDao"/>
      <!-- 注入事务管理模板-->
      <property name="transactionTemplate" ref="transactionTemplate"/>
   </bean>
- 手动编写代码实现事务管理:
- 使用“TransactionTemplate.execute(TransactionCallback<T> action)”方法。如:
public void transfer(final String from, final String to, final Double money) {
   transactionTemplate.execute(new TransactionCallbackWithoutResult() {
      @Override
      protected void doInTransactionWithoutResult(TransactionStatus status)
      {
         accountDao.outMoney(from, money);
         int d = 1 / 0;
         accountDao.inMoney(to, money);
      }
   });
}
事务管理:xml
步骤:
- 配置“事务管理器”;(需要配置“DataSource”)
- 配置事务“增强”;
- 配置“切面”;
	<!-- dataSource -->
    ...

	<!-- 第一步 配置事务管理器 -->
	<bean id="transactionManager" class="org.springframework.jdbc.datasource.DataSourceTransactionManager">
		<!-- 注入dataSource -->
		<property name="dataSource" ref="dataSource"></property>
	</bean>

	<!-- 第二步 配置事务增强 -->
	<tx:advice id="txadvice" transaction-manager="transactionManager">
		<!-- 做事务操作 -->
		<tx:attributes>
			<!-- 设置进行事务操作的方法匹配规则  -->
			<!--
				isolation="DEFAULT" 隔离级别
				propagation="REQUIRED" 传播行为
				read-only="false" 只读
				timeout="-1" 过期时间
				rollback-for="" -Exception
				no-rollback-for="" +Exception
			-->
			<tx:method name="account*" propagation="REQUIRED"/>
			<!-- <tx:method name="insert*" /> -->
		</tx:attributes>
	</tx:advice>

	<!-- 第三步 配置切面 -->
	<aop:config>
		<!-- 切入点 -->
		<aop:pointcut expression="execution(* cn.itcast.service.OrdersService.*(..))" id="pointcut1"/>
		<!-- 切面 -->
		<aop:advisor advice-ref="txadvice" pointcut-ref="pointcut1"/>
	</aop:config>
事务管理:注解
步骤:
- 配置“事务管理器”;(需要配置“DataSource”)
- 开启事务注解;
	<!-- dataSource -->
    ...

	<!-- 第一步配置事务管理器 -->
	<bean id="transactionManager" class="org.springframework.jdbc.datasource.DataSourceTransactionManager">
		<property name="dataSource" ref="dataSource"></property>
	</bean>

	<!-- 第二步 开启事务注解 -->
	<tx:annotation-driven transaction-manager="transactionManager"/>
- 使用“@Transactional”注解;(标注Service)
@Transactional
public class OrdersService {

	private OrdersDao ordersDao;
	public void setOrdersDao(OrdersDao ordersDao) {
		this.ordersDao = ordersDao;
	}

	//调用dao的方法
	//业务逻辑层,写转账业务
	public void accountMoney() {
		//小王少1000
		ordersDao.lessMoney();

		//出现异常
		int i = 10/0;

		//小马多1000
		ordersDao.moreMoney();
	}
}