“ElasticSearch:安装、head插件、集群、root启动”的版本间差异
跳到导航
跳到搜索
(建立内容为“category:ElasticSearch == 关于 == 【转自:[https://www.orchome.com/489 https://www.orchome.com/489]】 == Linux下安装 == * 确保jdk为jdk1.8.0_73…”的新页面) |
小无编辑摘要 |
||
| (未显示同一用户的3个中间版本) | |||
| 第1行: | 第1行: | ||
[[category: | [[category:ElasticSearch教程]] | ||
== 关于 == | == 关于 == | ||
【转自:[https://www.orchome.com/ | 【转自:[https://www.orchome.com/Elasticsearch/index https://www.orchome.com/Elasticsearch/index]】 | ||
== Linux下安装 == | == Linux下安装 == | ||
| 第89行: | 第89行: | ||
</syntaxhighlight> | </syntaxhighlight> | ||
如果出现: | 如果出现: | ||
<syntaxhighlight lang="bash" highlight=""> | |||
npm cannot be installed without Node.js. | npm cannot be installed without Node.js. | ||
Install Node.js first, and then try again. | Install Node.js first, and then try again. | ||
</syntaxhighlight> | </syntaxhighlight> | ||
则需要 安装Node.js: | 则需要 安装Node.js: | ||
<syntaxhighlight lang="bash" highlight=""> | |||
yum install -y nodejs | yum install -y nodejs | ||
</syntaxhighlight> | </syntaxhighlight> | ||
| 第100行: | 第100行: | ||
如果node.js版本过低,则需要升级: | 如果node.js版本过低,则需要升级: | ||
<syntaxhighlight lang="bash" highlight=""> | |||
# 第一步:首先安装 n 模块: | # 第一步:首先安装 n 模块: | ||
npm install -g n | npm install -g n | ||
| 第109行: | 第109行: | ||
== 集群搭建 == | == 集群搭建 == | ||
# | 以下是在同一台机器搭建两个 ES 服务,所以修改了两个服务的文件夹名,并用了不同的端口。 | ||
* 注意“# cluster”配置。 | |||
=== 修改配置 === | |||
node1 部署: | |||
<syntaxhighlight lang="bash" highlight=""> | |||
> tar zxvf elasticsearch-5.1.1.tar.gz -C /opt/ | |||
> cd /opt | |||
> mv elasticsearch-5.0.0 elasticsearch-node1 | |||
</syntaxhighlight> | |||
修改配置: | |||
<syntaxhighlight lang="bash" highlight=""> | |||
#cat /opt/elasticsearch-node1/config/elasticsearch.yml | |||
network.host: 0.0.0.0 | |||
http.port: 9200 | |||
http.cors.enabled: true | |||
http.cors.allow-origin: "*" | |||
# cluster | |||
cluster.name: "es-cluster" | |||
node.name: "es-node1" | |||
node.master: true | |||
node.data: true | |||
http.enabled: true | |||
</syntaxhighlight> | </syntaxhighlight> | ||
node2 部署: | |||
<syntaxhighlight lang="bash" highlight=""> | |||
> cd /opt | |||
cp elasticsearch-node1 elasticsearch-node2 | |||
</syntaxhighlight> | |||
修改配置: | |||
<syntaxhighlight lang="bash" highlight=""> | |||
#cat /opt/elasticsearch-node2/config/elasticsearch.yml | |||
network.host: 0.0.0.0 | |||
http.port: 9201 | |||
http.cors.enabled: true | |||
http.cors.allow-origin: "*" | |||
# cluster | |||
cluster.name: "es-cluster" | |||
node.name: "es-node2" | |||
node.master: true | |||
node.data: true | |||
http.enabled: true | |||
</syntaxhighlight> | |||
=== 启动 === | |||
启动: | |||
<syntaxhighlight lang="bash" highlight=""> | |||
>chown www:www -R /opt/elasticsearch-node1 | |||
>chown www:www -R /opt/elasticsearch-node2 | |||
>su - www -c "/opt/elasticsearch-5.0.0-node1/bin/elasticsearch >/dev/null 2>&1 &" | |||
>su - www -c "/opt/elasticsearch-5.0.0-node2/bin/elasticsearch >/dev/null 2>&1 &" | |||
</syntaxhighlight> | </syntaxhighlight> | ||
* elasticsearch不支持root直接启动。 | |||
访问: | |||
<syntaxhighlight lang="bash" highlight=""> | |||
# curl https://localhost:9200 | |||
{ | |||
"name" : "es-node1", | |||
"cluster_name" : "es-cluster", | |||
"cluster_uuid" : "2C5tWrgISW6V-SAX203LbQ", | |||
"version" : { | |||
"number" : "5.1.1", | |||
"build_hash" : "253032b", | |||
"build_date" : "2016-11-26T04:37:51.531Z", | |||
"build_snapshot" : false, | |||
"lucene_version" : "6.2.0" | |||
}, | |||
"tagline" : "You Know, for Search" | |||
} | |||
</syntaxhighlight> | |||
<syntaxhighlight lang="bash" highlight=""> | |||
# curl https://localhost:9201 | |||
"name" : "es-node2", | |||
"cluster_name" : "es-cluster", | |||
"cluster_uuid" : "2C5tWrgISW6V-SAX203LbQ", | |||
"version" : { | |||
"number" : "5.1.1", | |||
"build_hash" : "253032b", | |||
"build_date" : "2016-11-26T04:37:51.531Z", | |||
"build_snapshot" : false, | |||
"lucene_version" : "6.2.0" | |||
}, | |||
"tagline" : "You Know, for Search" | |||
} | |||
</syntaxhighlight> | </syntaxhighlight> | ||
=== 问题:节点不能发现集群? 【???】=== | |||
es1,es2,es3 三台 es 组成一个集群,集群状态正常: | |||
# 当 es1 服务器重启后,es1 不能加到集群中,自己选举自己为master,这就产生了 es 集群中所谓的“脑裂”,把 es1 的 es 服务重启后,es1 则能正常发现集群并加入。 | |||
# 当重启 es2 服务器后,es2 不能加到集群中,自己选举自己为master,也产生了 es 集群中所谓的“脑裂”,当重启 es 服务后,还是不能发现集群。 | |||
# 当重启 es3 服务器后,es3 能加到集群中。正常。 | |||
症结:网络原因导致节点在超时时间内不能发现集群,所以直接选举自己作为 master。 | |||
解决:???修改设置 discovery.zen.ping_timeout ,增加搜索集群的超时时间。(discovery.zen 是 es 中一个集群服务) | |||
: <syntaxhighlight lang="xml" highlight=""> | |||
discovery.zen.ping.multicast.enabled: false | |||
discovery.zen.ping_timeout: 120s | |||
discovery.zen.minimum_master_nodes: 2 #至少要发现集群可做master的节点数, | |||
client.transport.ping_timeout: 60s | |||
discovery.zen.ping.unicast.hosts: ["10.0.31.2", "10.0.33.2"] | |||
</syntaxhighlight> | </syntaxhighlight> | ||
== 用root启动elasticsearch == | |||
启动 elasticserach: | |||
<syntaxhighlight lang="bash" highlight=""> | |||
./bin/elasticsearch -d | |||
</syntaxhighlight> | |||
错误如下: | |||
<syntaxhighlight lang="bash" highlight=""> | |||
java.lang.RuntimeException: don't run elasticsearch as root. | |||
at org.elasticsearch.bootstrap.Bootstrap.initializeNatives(Bootstrap.java:94) | |||
at org.elasticsearch.bootstrap.Bootstrap.setup(Bootstrap.java:160) | |||
at org.elasticsearch.bootstrap.Bootstrap.init(Bootstrap.java:286) | |||
at org.elasticsearch.bootstrap.Elasticsearch.main(Elasticsearch.java:35) | |||
</syntaxhighlight> | </syntaxhighlight> | ||
解决: | |||
* 临时使用root账号启动。 | |||
*: 启动命令添加(“-Des.insecure.allow.root=true”): | |||
*: <syntaxhighlight lang="bash" highlight=""> | |||
bin/elasticsearch -Des.insecure.allow.root=true | |||
</syntaxhighlight> | </syntaxhighlight> | ||
* 默认以root账号启动。 | |||
*: 修改 /bin/elasticsearch 文件: | |||
*: <syntaxhighlight lang="bash" highlight=""> | |||
bin/elasticsearch -Des.insecure.allow.root=true | |||
// 修改为: | |||
exec"$JAVA"$JAVA_OPTS$ES_JAVA_OPTS -Des.path.home="$ES_HOME" -Des.insecure.allow.root=true -cp "$ES_CLASSPATH" \ | |||
</syntaxhighlight> | </syntaxhighlight> | ||
2023年3月31日 (五) 22:02的最新版本
关于
【转自:https://www.orchome.com/Elasticsearch/index】
Linux下安装
- 确保jdk为jdk1.8.0_73以上,并已确保安装ok。
- 下载 ElasticSearch:
wget https://artifacts.elastic.co/downloads/elasticsearch/elasticsearch-5.1.1.tar.gz
tar -zxvf elasticsearch-5.1.1.tar.gz

cd elasticsearch-5.1.1
- 修改limit限制:(5.0以后都要修改)
> vi /etc/security/limits.conf
* soft nofile 65536
* hard nofile 65536

> echo 'vm.max_map_count=262144'>> /etc/sysctl.conf
> sysctl -p

> vi /etc/security/limits.d/90-nproc.conf
*          soft    nproc     2048
- 设置配置文件:
> vim config/elasticsearch.yml

node.name: node-1
path.data: /tmp/elasticsearch/data
path.logs: /tmp/elasticsearch/logs
network.host: 192.168.x.x
http.port: 9200
# 跨域
http.cors.enabled: true
http.cors.allow-origin: "*"
- 创建用户:
# 创建elasticsearch用户
groupadd elasticsearch
useradd elasticsearch -g elasticsearch -p elasticsearch
# 赋权限
chown elasticsearch:elasticsearch -R /usr/local/elasticsearch-5.1.1
- 启动:
su - elasticsearch -c "nohup /usr/local/elasticsearch-5.1.1/bin/elasticsearch >/dev/null 2>&1 &"
head插件的安装
- 下载:
git clone git://github.com/mobz/elasticsearch-head.git
cd elasticsearch-head
- 在 elasticsearch-head 目录下 node_modules/grunt 下如果没有 grunt 二进制程序,需要执行:
cd elasticsearch-head
npm install grunt --save
- 修改服务器监听地址:
- 修改 elasticsearch-head 下 Gruntfile.js 文件,默认监听在 127.0.0.1 下 9200 端口;
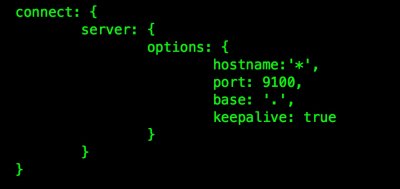
- 修改head的连接地址:(目录:head/_site/app.js)(把 localhost 修改成 es 的服务器地址)
this.base_uri = this.config.base_uri || this.prefs.get("app-base_uri") || "https://localhost:9200";
- 在head目录中,执行npm install下载依赖的包:
npm install
- 启动服务:
/usr/local/elasticsearch-head/node_modules/grunt/bin/grunt server

- 访问:https://192.168.1.1:9100


如果没有npm,则需安装npm
如下:
curl https://npmjs.org/install.sh | sh
sh install.sh
如果出现:
npm cannot be installed without Node.js.
Install Node.js first, and then try again.
则需要 安装Node.js:
yum install -y nodejs
如果node.js版本过低,则需要升级:
# 第一步:首先安装 n 模块:
npm install -g n

# 第二步:升级node.js到最新稳定版
n stable
集群搭建
以下是在同一台机器搭建两个 ES 服务,所以修改了两个服务的文件夹名,并用了不同的端口。
- 注意“# cluster”配置。
修改配置
node1 部署:
> tar zxvf elasticsearch-5.1.1.tar.gz -C /opt/
> cd /opt
> mv elasticsearch-5.0.0 elasticsearch-node1
修改配置:
#cat /opt/elasticsearch-node1/config/elasticsearch.yml
network.host: 0.0.0.0
http.port: 9200
http.cors.enabled: true
http.cors.allow-origin: "*"
# cluster
cluster.name: "es-cluster"
node.name: "es-node1"
node.master: true
node.data: true
http.enabled: true
node2 部署:
> cd /opt
cp elasticsearch-node1 elasticsearch-node2
修改配置:
#cat /opt/elasticsearch-node2/config/elasticsearch.yml
network.host: 0.0.0.0
http.port: 9201
http.cors.enabled: true
http.cors.allow-origin: "*"
# cluster
cluster.name: "es-cluster"
node.name: "es-node2"
node.master: true
node.data: true
http.enabled: true
启动
启动:
>chown www:www -R /opt/elasticsearch-node1
>chown www:www -R /opt/elasticsearch-node2
>su - www -c "/opt/elasticsearch-5.0.0-node1/bin/elasticsearch >/dev/null 2>&1 &"
>su - www -c "/opt/elasticsearch-5.0.0-node2/bin/elasticsearch >/dev/null 2>&1 &"
- elasticsearch不支持root直接启动。
访问:
# curl https://localhost:9200
{
  "name" : "es-node1",
  "cluster_name" : "es-cluster",
  "cluster_uuid" : "2C5tWrgISW6V-SAX203LbQ",
  "version" : {
    "number" : "5.1.1",
    "build_hash" : "253032b",
    "build_date" : "2016-11-26T04:37:51.531Z",
    "build_snapshot" : false,
    "lucene_version" : "6.2.0"
  },
  "tagline" : "You Know, for Search"
}
# curl https://localhost:9201
  "name" : "es-node2",
  "cluster_name" : "es-cluster",
  "cluster_uuid" : "2C5tWrgISW6V-SAX203LbQ",
  "version" : {
    "number" : "5.1.1",
    "build_hash" : "253032b",
    "build_date" : "2016-11-26T04:37:51.531Z",
    "build_snapshot" : false,
    "lucene_version" : "6.2.0"
  },
  "tagline" : "You Know, for Search"
}
问题:节点不能发现集群? 【???】
es1,es2,es3 三台 es 组成一个集群,集群状态正常:
- 当 es1 服务器重启后,es1 不能加到集群中,自己选举自己为master,这就产生了 es 集群中所谓的“脑裂”,把 es1 的 es 服务重启后,es1 则能正常发现集群并加入。
- 当重启 es2 服务器后,es2 不能加到集群中,自己选举自己为master,也产生了 es 集群中所谓的“脑裂”,当重启 es 服务后,还是不能发现集群。
- 当重启 es3 服务器后,es3 能加到集群中。正常。
症结:网络原因导致节点在超时时间内不能发现集群,所以直接选举自己作为 master。
解决:???修改设置 discovery.zen.ping_timeout ,增加搜索集群的超时时间。(discovery.zen 是 es 中一个集群服务)
discovery.zen.ping.multicast.enabled: false
discovery.zen.ping_timeout: 120s
discovery.zen.minimum_master_nodes: 2 #至少要发现集群可做master的节点数,
client.transport.ping_timeout: 60s
discovery.zen.ping.unicast.hosts: ["10.0.31.2", "10.0.33.2"]
用root启动elasticsearch
启动 elasticserach:
./bin/elasticsearch -d
错误如下:
java.lang.RuntimeException: don't run elasticsearch as root.
        at org.elasticsearch.bootstrap.Bootstrap.initializeNatives(Bootstrap.java:94)
        at org.elasticsearch.bootstrap.Bootstrap.setup(Bootstrap.java:160)
        at org.elasticsearch.bootstrap.Bootstrap.init(Bootstrap.java:286)
        at org.elasticsearch.bootstrap.Elasticsearch.main(Elasticsearch.java:35)
解决:
- 临时使用root账号启动。
- 启动命令添加(“-Des.insecure.allow.root=true”):
bin/elasticsearch -Des.insecure.allow.root=true
- 默认以root账号启动。
- 修改 /bin/elasticsearch 文件:
bin/elasticsearch -Des.insecure.allow.root=true

// 修改为:

exec"$JAVA"$JAVA_OPTS$ES_JAVA_OPTS -Des.path.home="$ES_HOME" -Des.insecure.allow.root=true -cp "$ES_CLASSPATH" \