“FAQ:IDEA”的版本间差异
跳到导航
跳到搜索
| 第63行: | 第63行: | ||
#: [[File:IDEA:打包流程:测试 jar 包.png|400px]] | #: [[File:IDEA:打包流程:测试 jar 包.png|400px]] | ||
== IDEA 后缀补全 == | == IDEA 设置:代码模板 == | ||
=== 实时模板 === | |||
设置: | |||
: [[File:IDEA设置:实时模板.png|800px]] | |||
使用示例: | |||
# '''psvm''' 或 '''main''': | |||
#: 输入: | |||
#: <syntaxhighlight lang="Java" highlight="2"> | |||
public class Test { | |||
psvm | |||
} | |||
</syntaxhighlight> | |||
#: 效果: | |||
#: <syntaxhighlight lang="Java" highlight="2-4"> | |||
public class Test { | |||
public static void main(String[] args) { | |||
} | |||
} | |||
</syntaxhighlight> | |||
# '''sout''': | |||
#: 输入: | |||
#: <syntaxhighlight lang="Java" highlight="3"> | |||
public class Test { | |||
public static void main(String[] args) { | |||
sout | |||
} | |||
} | |||
</syntaxhighlight> | |||
#: 效果: | |||
#: <syntaxhighlight lang="Java" highlight="3"> | |||
public class Test { | |||
public static void main(String[] args) { | |||
System.out.println(); | |||
} | |||
} | |||
</syntaxhighlight> | |||
=== 后缀补全 === | |||
设置: | |||
: [[File:IDEA设置:后缀补全.png|800px]] | : [[File:IDEA设置:后缀补全.png|800px]] | ||
使用示例: | 使用示例: | ||
: 输入: | # xxx'''.sout''': | ||
: <syntaxhighlight lang="Java" highlight=" | #: 输入: | ||
#: <syntaxhighlight lang="Java" highlight="3"> | |||
public class Test { | public class Test { | ||
public static void main(String[] args) { | public static void main(String[] args) { | ||
| 第79行: | 第119行: | ||
} | } | ||
</syntaxhighlight> | </syntaxhighlight> | ||
: 效果: | #: 效果: | ||
: <syntaxhighlight lang="Java" highlight=" | #: <syntaxhighlight lang="Java" highlight="3"> | ||
public class Test { | public class Test { | ||
public static void main(String[] args) { | public static void main(String[] args) { | ||
System.out.println("你好"); | System.out.println("你好"); | ||
} | |||
} | |||
</syntaxhighlight> | |||
# xxx'''.try''': | |||
#: 输入: | |||
#: <syntaxhighlight lang="Java" highlight="3"> | |||
public class Test { | |||
public static void main(String[] args) { | |||
Helloworld.main();.try | |||
} | |||
} | |||
</syntaxhighlight> | |||
#: 效果: | |||
#: <syntaxhighlight lang="Java" highlight="3-7"> | |||
public class Test { | |||
public static void main(String[] args) { | |||
try { | |||
Helloworld.main(); | |||
} catch (Exception e) { | |||
throw new RuntimeException(e); | |||
} | |||
} | } | ||
} | } | ||
2022年5月6日 (五) 22:59的版本
IDEA 调试按钮
Debug 窗口:

Debug 操作:

Debug:调试按钮
- 显示执行点(Show Execution Point,
Alt + F10):- 如果你的光标在其它行或其它页面,点击这个按钮可跳转到当前代码执行的行。
- 步过(Step Over,
F8):- 一行一行地往下走,如果这一行上有方法不会进入方法。
- 步入(Step Into,
F7):- 如果当前行有方法,可以进入方法内部,一般用于进入自定义方法内,不会进入官方类库的方法。
- 强制步入(Force Step Into,
Alt + Shift + F7):- 能进入任何方法,查看底层源码的时候可以用这个进入官方类库的方法。
- 步出(Step Out,
Shift + F8):- 从步入的方法内退出到方法调用处,此时方法已执行完毕,只是还没有完成赋值。
- 运行到光标处(Run to Cursor,
Alt + F9):- 你可以将光标定位到你需要查看的那一行,然后使用这个功能,代码会运行至光标行,而不需要打断点。
- 评估表达式(Evaluate Expression,
Alt + F8)- 表达式不仅可以是算数计算,也可以是一般变量、参数,还可以是方法;
- 在计算表达式的框里,可以改变变量的值,这样就能能很方便去调试各种值的情况;
Debug:服务按钮
- 重新运行(
Ctrl + F5) - 修改运行配置(
Ctrl + F5) - 恢复程序(Resume Program,
F9):向下执行程序,直到下一个断点。 - 暂停程序(Pause Program)
- 停止程序(Stop 'xxx',
Ctrl + F2) - 查看断点(View Breakpoints,
Ctrl + Shift + F8) - 静音断点(Mute Breakpoints):使所有断点失效(变为灰色)
- 此时,按 F9 则可以直接运行完程序;
- 如果只想使某一个断点失效,可以在断点上右键取消“Enabled”;
IDEA 打包流程
步骤:
- 打开“项目结构”(
Ctrl + Alt + Shift + S);- 选择“工件”(Artifacts)-> 添加“JAR”-> 选择:“空”或“来自具有依赖项的模块”
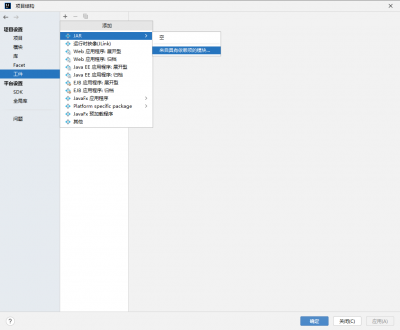
- JAR:“空”
- 修改名称;
- 设置清单;
- 指定主类;
- 添加元素;(向 Jar 添加编译后的 Class 文件)
- 修改名称;
- JAR:“来自具有依赖项的模块”【即:从模块创建JAR】
- 设置向导:模块、主类:
- 工件详情:
- 设置向导:模块、主类:
- 构建工件:
- Jar 包测试:


IDEA 设置:代码模板
实时模板
设置:

使用示例:
- psvm 或 main:
- 输入:
public class Test {
    psvm
}
- 效果:
public class Test {
    public static void main(String[] args) {

    }
}
- sout:
- 输入:
public class Test {
    public static void main(String[] args) {
        sout
    }
}
- 效果:
public class Test {
    public static void main(String[] args) {
        System.out.println();
    }
}
后缀补全
设置:

使用示例:
- xxx.sout:
- 输入:
public class Test {
    public static void main(String[] args) {
        "你好".sout
    }
}
- 效果:
public class Test {
    public static void main(String[] args) {
        System.out.println("你好");
    }
}
- xxx.try:
- 输入:
public class Test {
    public static void main(String[] args) {
        Helloworld.main();.try
    }
}
- 效果:
public class Test {
    public static void main(String[] args) {
        try {
            Helloworld.main();
        } catch (Exception e) {
            throw new RuntimeException(e);
        }
    }
}
IDEA 运行前构建会检查出所有类的错误
IDEA 默认情况下:
1、在“调试/运行”某个类之前,会进行“构建”(Build);
2、在“构建”过程中,会检查并报告(项目或模块下的)所有类的错误;
3、若“构建”失败,则取消“调试/运行”。

即:想要“调试/运行”当前类,就必须确保所有类都没有错误。十分不方便。
通过以下两种方式可以解决:
- 运行前不构建
- 构建,无错误检查
- 都只对当前类有效,需要配置类的“运行/调试配置”
设置:“运行前不构建”
如此:可直接“调试/运行”类,而不进行“构建”

【没有“构建”过程,在右下角“通知”无任何提示】
“运行/调试配置”:
- 选择配置的类;
- 在“运行”栏,点击“修改选项”:勾选 Java 下的“运行前不构建”;

设置:“添加启动前任务”:“构建,无错误检查”
如此:可在“构建”过程中,不检查类的错误信息

【仍有“构建”过程,在右下角“通知”提示:编译耗时、找到的“错误/警告”】
“运行/调试配置”:
- 选择配置的类;
- 在“运行”栏,点击“修改选项”:勾选“添加启动前任务”;
- 在“启动前”栏:添加新任务“构建,无错误检查”;


P.S.:编译单个类
如此:仅“编译”单个类,不会提示其他类错误
步骤:
- (在编辑区,将光标定位到需要的类下):
- 在导航栏“构建”:点击“重新编译”;
