“Spring:IOC”的版本间差异
跳到导航
跳到搜索
| (未显示同一用户的1个中间版本) | |||
| 第271行: | 第271行: | ||
=== 注解的相关配置 === | === 注解的相关配置 === | ||
“applicationContext.xml”中添加注解扫描: | “applicationContext.xml”中添加注解扫描: | ||
<syntaxhighlight lang="properties"> | # 扫描“类”、“方法”、“属性”上面的注解: | ||
#*(包含了“<context:annotation-config>”的功能) | |||
#: <syntaxhighlight lang="properties"> | |||
<!-- Spring 的注解开发:组件扫描(类上注解: 可以直接使用属性注入的注解) --> | <!-- Spring 的注解开发:组件扫描(类上注解: 可以直接使用属性注入的注解) --> | ||
<context:component-scan base-package="com.itheima.spring.demo1"/> | <context:component-scan base-package="com.itheima.spring.demo1"/> | ||
</syntaxhighlight> | |||
# 扫描“属性”上面的注解: | |||
#: <syntaxhighlight lang="properties"> | |||
<!-- 扫描属性上面的注解 --> | |||
<context:annotation-config></context:annotation-config> | |||
</syntaxhighlight> | </syntaxhighlight> | ||
| 第380行: | 第387行: | ||
== 常见问题 == | == 常见问题 == | ||
=== | === 依赖对象冲突(@Qualifier、@Primary)=== | ||
=== | 依赖对象冲突:即,具有多个符合条件的依赖对象;<br/> | ||
为了解决这个问题,必须明确地指示 Spring 使用冲突的 bean 中的哪一个: | |||
==== “@Qualifier” ==== | |||
@Qualifier 注解与“@Autowired”配合使用,来'''指定注入对象''': | |||
# 具有多个符合条件的依赖对象: | |||
#: <syntaxhighlight lang="java"> | |||
@Component("combustionEngine") | |||
public class CombustionEngine implements Engine { | |||
... | |||
} | |||
</syntaxhighlight> | |||
#: <syntaxhighlight lang="java"> | |||
@Component("electricEngine") | |||
public class ElectricEngine implements Engine { | |||
... | |||
} | |||
</syntaxhighlight> | |||
# 指定对象: | |||
#: <syntaxhighlight lang="java" highlight="5"> | |||
@Component | |||
public class Car { | |||
@Autowired | |||
public Car(@Qualifier("combustionEngine") Engine engine) { | |||
this.engine = engine; | |||
} | |||
... | |||
} | |||
</syntaxhighlight> | |||
==== “@Primary” ==== | |||
将“@Primary”注释添加到类中,设置'''默认注入对象''': | |||
# 具有多个符合条件的依赖对象,但设置了“@Primary”类型: | |||
#: <syntaxhighlight lang="java" highlight="2"> | |||
@Component | |||
@Primary | |||
public class CombustionEngine implements Engine { | |||
... | |||
} | |||
</syntaxhighlight> | |||
#: <syntaxhighlight lang="java"> | |||
@Component | |||
public class ElectricEngine implements Engine { | |||
... | |||
} | |||
</syntaxhighlight> | |||
# 自动装配默认对象: | |||
#: <syntaxhighlight lang="java"> | |||
@Component | |||
public class Car { | |||
@Autowired | |||
public Car(Engine engine) { | |||
this.engine = engine; | |||
} | |||
... | |||
} | |||
</syntaxhighlight> | |||
=== 循环依赖(@Lazy)=== | |||
如果对象之间出现了循环依赖,不能成功地创建其中任何一个Bean: | |||
<syntaxhighlight lang="java"> | |||
@Component | |||
public class Foo { | |||
private Bar bar; | |||
@Autowired | |||
public Foo(Bar bar) { | |||
this.bar = bar; | |||
} | |||
} | |||
</syntaxhighlight> | |||
<syntaxhighlight lang="java"> | |||
@Component | |||
public class Bar { | |||
private Foo foo; | |||
@Autowired | |||
public Bar(Foo foo) { | |||
this.foo = foo; | |||
} | |||
} | |||
</syntaxhighlight> | |||
Foo构造需要Bar对象,Bar构造需要Foo对象; | |||
为了解决打破循环,可以使用“'''@Lazy'''”注释,允许其中一个Bean先初始化: | |||
* “@Lazy”使 Spring 推迟“带注解的bean”和“带注释的@Autowired位置”的初始化。 | |||
<syntaxhighlight lang="java" highlight="7"> | |||
@Component | |||
public class Foo { | |||
private Bar bar; | |||
@Autowired | |||
public Foo(@Lazy Bar bar) { | |||
this.bar = bar; | |||
} | |||
} | |||
</syntaxhighlight> | |||
<syntaxhighlight lang="java" highlight="2"> | |||
@Component | |||
@Lazy | |||
public class Bar { | |||
private Foo foo; | |||
@Autowired | |||
public Bar(Foo foo) { | |||
this.foo = foo; | |||
} | |||
} | |||
</syntaxhighlight> | |||
2020年10月28日 (三) 22:55的最新版本
关于IOC
IOC:Inversion of Control 控制反转,指的是对象的创建权反转(交给)给Spring,作用是实现了程序的解耦合。

下载:
- 官网:“http://spring.io/”
- 下载地址:“http://repo.springsource.org/libs-release-local/org/springframework/spring”
Spring 目录结构:
- docs:API 和开发规范
- libs:jar 包和源码
- schema:约束
相关jar:
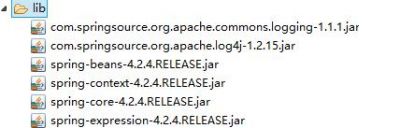
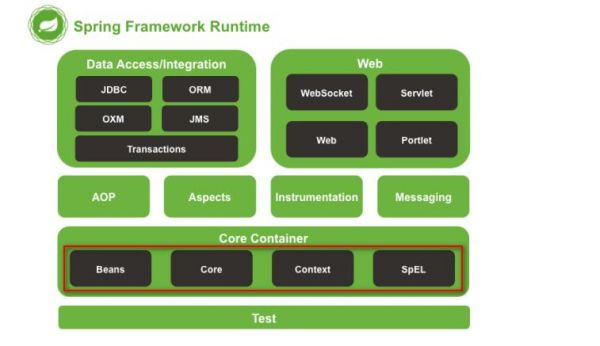
- 即“core container”的四个部分;


使用示例
- 创建web 项目
- 引入Spring 的开发包
- 相关配置文件:
- log4j.properties:日志配置
- applicationContext.xml:Spring配置文件:
- (配置说明,位于包的doc中:“spring-framework-4.2.4.RELEASE\docs\spring-framework-reference\html\xsd-configuration.html”)
<beans xmlns="http://www.springframework.org/schema/beans"
   xmlns:xsi="http://www.w3.org/2001/XMLSchema-instance"
   xsi:schemaLocation="
   http://www.springframework.org/schema/beans
   http://www.springframework.org/schema/beans/spring-beans.xsd">
</beans>
- 编写相关的类:
public interface UserDao {
   public void sayHello();
}
public class UserDaoImpl implements UserDao {
   @Override
   public void sayHello() {
      System.out.println("Hello Spring...");
   }
}
- 完成配置:
<!-- Spring 的入门案例 -->
<bean id="userDao" class="cn.itcast.spring.demo1.UserDaoImpl"></bean>
- 编写测试程序:
@Test
// Spring 的方式:
public void demo2(){
   // 创建Spring 的工厂类:
   ApplicationContext applicationContext = new ClassPathXmlApplicationContext("applicationContext.xml");
   // 通过工厂解析XML 获取Bean 的实例.
   UserDao userDao = (UserDao) applicationContext.getBean("userDao");
   userDao.sayHello();
}
Spring 中的工厂
- BeanFactory :是在getBean 的时候才会生成类的实例.
- ApplicationContext :在加载applicationContext.xml 时候就会创建.
ApplicationContext
ApplicatioContext 接口有两个实现类:
- “ClassPathXmlApplicationContext”:加载类路径下Spring 的配置文件;
- “FileSystemXmlApplicationContext”:加载本地磁盘下Spring 的配置文件;

BeanFactory

Spring 的相关配置
- 分配置文件,实现的两种方法:
- 加载多个配置文件:
ApplicationContext applicationContext = new ClassPathXmlApplicationContext("applicationContext.xml","applicationContext2.xml");
- 在主配置文件(“applicationContext.xml”)中包含其他配置文件,如:
<import resource="applicationContext2.xml"></import>
- 加载多个配置文件:
Bean的管理:XML
相关配置
- id:唯一确定一个Bean(唯一性约束),必须以字母开始,可以使用字母、数字、连字符、下划线、句点、冒号,不能出现特殊字符;
- name:Bean的名称(没有唯一性约束),name可以使用特殊字符;如果<bean>没有id 的话, name 可以当做id 使用;
- class:类的全路径名称;
- 整合struts1 的时候:“<bean name=”/loginAction” >”;
- scope:Bean 的作用范围;
- “singleton”:(默认)单例;
- “prototype”:多例;
- “request”:WEB 项目中,Spring 创建一个Bean 的对象,将对象存入到request 域中;
- “session”:WEB 项目中,Spring 创建一个Bean 的对象,将对象存入到session 域中;
- “globalSession”:WEB 项目中,应用在Porlet 环境.如果没有Porlet 环境那么globalSession 相当于session;
- Bean 的生命周期的配置:通过配置<bean>标签上的“init-method”作为Bean 的初始化的时候执行的方法,配置“destroy-method”作为Bean 的销毁的时候执行的方法。
- 销毁方法想要执行,需要是单例创建的Bean;而且在工厂关闭的时候,Bean 才会被销毁.
Bean实例化的三种方式
- 使用类的无参数构造创建(重点)
<!-- 方式一:无参数的构造方法的实例化-->
<bean id="bean1" class="cn.itcast.spring.demo3.Bean1"></bean>
- 使用静态工厂创建:
// 提供一个工厂类
public class Bean2Factory {
   public static Bean2 getBean2(){
      return new Bean2();
   }
}
<!-- 方式二:静态工厂实例化Bean -->
<bean id="bean2" class="cn.itcast.spring.demo3.Bean2Factory" factory-method="getBean2"/>
- 使用实例工厂创建
// 提供Bean3 的实例工厂:
public class Bean3Factory {
   public Bean3 getBean3(){
      return new Bean3();
   }
}
<!-- 方式三:实例工厂实例化Bean -->
<bean id="bean3Factory" class="cn.itcast.spring.demo3.Bean3Factory"></bean>
<bean id="bean3" factory-bean="bean3Factory" factory-method="getBean3"></bean>
依赖注入(DI)
DI(Dependency Injection):依赖注入,使用IOC创建类的过程中,将类所依赖的属性设置进去。
依赖注入:方法

- 构造函数注入:
   <!-- 第一种:构造方法的方式-->
   <bean id="car" class="cn.itcast.spring.demo4.Car">
      <constructor-arg name="name" value="保时捷"/>
      <constructor-arg name="price" value="1000000"/>
   </bean>
- Setter注入:
   <!-- 第二种:set 方法的方式-->
   <bean id="car2" class="cn.itcast.spring.demo4.Car2">
      <property name="name" value="奇瑞QQ"/>
      <property name="price" value="40000"/>
   </bean>
接口注入:(要求组件必须与特定的接口相关联,不常使用)
依赖注入:应用
常见的几个应用形式:
- 【同样依靠与基本的“setter注入”(即必须有对应的set方法),只是写法或注入的内容不一样;】
- 对象类型的注入:
   <!-- 注入对象类型的属性-->
   <bean id="person" class="cn.itcast.spring.demo4.Person">
      <property name="name" value="会希"/>
      <!-- ref 属性:引用另一个bean 的id 或name -->
      <property name="car2" ref="car2"/>
   </bean>
- 名称空间p 的属性注入;(Spring2.x 以上)
<!-- 第一步:引入p 名称空间 -->
<beans xmlns="http://www.springframework.org/schema/beans"
   xmlns:p="http://www.springframework.org/schema/p"
   xmlns:xsi="http://www.w3.org/2001/XMLSchema-instance"
   xsi:schemaLocation="
   http://www.springframework.org/schema/beans
   http://www.springframework.org/schema/beans/spring-beans.xsd">

   <!-- 第二步:使用p 名称空间.
   * 普通属性: p:属性名称=””
   * 对象类型属性: p:属性名称-ref=”” -->

   <!-- p 名称空间的属性注入的方式-->
   <bean id="car2" class="cn.itcast.spring.demo4.Car2" p:name=" 宝马7" p:price="1200000"/>
   <bean id="person" class="cn.itcast.spring.demo4.Person" p:name=" 思聪" p:car2-ref="car2"/>
   ...
- SpEL 方式的属性注入:(Spring3.x 以上)
- SpEL:Spring Expression Language,语法;“#{ SpEL }”;
   <!-- SpEL 的注入的方式-->
   <bean id="car2" class="cn.itcast.spring.demo4.Car2">
      <property name="name" value="#{'奔驰'}"/>
      <property name="price" value="#{800000}"/>
   </bean>

   <bean id="person" class="cn.itcast.spring.demo4.Person">
      <property name="name" value="#{'冠希'}"/>
      <property name="car2" value="#{car2}"/>
   </bean>
   <!-- SpEL 引用另一个类的属性-->

   <bean id="carInfo" class="cn.itcast.spring.demo4.CarInfo"></bean>

   <bean id="car2" class="cn.itcast.spring.demo4.Car2">
      <!-- <property name="name" value="#{'奔驰'}"/> -->
      <property name="name" value="#{carInfo.carName}"/>
      <property name="price" value="#{carInfo.calculatePrice()}"/>
   </bean>
- 注入复杂类型:
   <!-- Spring 的复杂类型的注入 -->
   <bean id="collectionBean" class="cn.itcast.spring.demo5.CollectionBean">
      <!-- 数组类型的属性-->
      <property name="arrs">
         <list>
            <value>会希</value>
            <value>冠希</value>
            <value>天一</value>
         </list>
      </property>
      <!-- 注入List 集合的数据-->
      <property name="list">
         <list>
            <value>芙蓉</value>
            <value>如花</value>
            <value>凤姐</value>
         </list>
      </property>
      <!-- 注入Map 集合-->
      <property name="map">
         <map>
            <entry key="aaa" value="111"/>
            <entry key="bbb" value="222"/>
            <entry key="ccc" value="333"/>
         </map>
      </property>
      <!-- Properties 的注入-->
      <property name="properties">
         <props>
            <prop key="username">root</prop>
            <prop key="password">123</prop>
         </props>
      </property>
</bean>
Bean的管理:注解
注解的相关配置
“applicationContext.xml”中添加注解扫描:
- 扫描“类”、“方法”、“属性”上面的注解:
- (包含了“<context:annotation-config>”的功能)
   <!-- Spring 的注解开发:组件扫描(类上注解: 可以直接使用属性注入的注解) -->
   <context:component-scan base-package="com.itheima.spring.demo1"/>
- 扫描“属性”上面的注解:
   <!-- 扫描属性上面的注解 -->
   <context:annotation-config></context:annotation-config>
Bean相关的注解
| 注解 | 说明 |
|---|---|
| 对象注解
(Component及其衍生注解,功能一致) | |
| @Component | 组件; |
| @Controller | WEB 层; |
| @Service | 业务层; |
| @Repository | 持久层; |
| 注入注解
(使用注解注入的方式,可以不用提供“set”方法) | |
| @Value | 用于注入普通类型; |
| @Autowired | 自动装配;
|
| @Resource | 相当于“@Autowired”和“@Qualifier” 一起使用; |
| 范围注解 | |
| @Scope | 作用范围;
|
| 生命周期 | |
| @PostConstruct | 相当于“init-method”; |
| @PreDestroy | 相当于“destroy-method” |
示例:
@Service(value="userService")
public class UserService {

   // @Autowired
   // private UserDao userDao;

	// name属性值 写 注解创建dao对象 value值
	@Resource(name="userDao")
	private UserDao userDao;

   // 使用注解方式时候不需要set方法

	public void add() {
		System.out.println("service...........");
		userDao.add();
	}
}
XML 与 注解

- XML:结构清晰;
- 注解:开发方便;(属性注入)
混合使用
- 创建对象操作使用配置文件方式实现:
	<!-- 开启注解扫描 -->
	<context:component-scan base-package="cn.itcast"></context:component-scan>

	<!-- 配置对象 -->
	<bean id="bookService" class="cn.itcast.xmlanno.BookService"></bean>
	<bean id="bookDao" class="cn.itcast.xmlanno.BookDao"></bean>
	<bean id="ordersDao" class="cn.itcast.xmlanno.OrdersDao"></bean>
- 注入属性的操作使用注解方式实现:
public class BookService {

	//得到bookdao和ordersdao对象
	@Resource(name="bookDao")
	private BookDao bookDao;

	@Resource(name="ordersDao")
	private OrdersDao ordersDao;

	public void add() {
		System.out.println("service.........");
		bookDao.book();
		ordersDao.buy();
	}
}
常见问题
依赖对象冲突(@Qualifier、@Primary)
依赖对象冲突:即,具有多个符合条件的依赖对象;
为了解决这个问题,必须明确地指示 Spring 使用冲突的 bean 中的哪一个:
“@Qualifier”
@Qualifier 注解与“@Autowired”配合使用,来指定注入对象:
- 具有多个符合条件的依赖对象:
@Component("combustionEngine")
public class CombustionEngine implements Engine {
   ...
}
@Component("electricEngine")
public class ElectricEngine implements Engine {
   ...
}
- 指定对象:
@Component
public class Car {

   @Autowired
   public Car(@Qualifier("combustionEngine") Engine engine) {
      this.engine = engine;
   }
   ...
}
“@Primary”
将“@Primary”注释添加到类中,设置默认注入对象:
- 具有多个符合条件的依赖对象,但设置了“@Primary”类型:
@Component
@Primary
public class CombustionEngine implements Engine {
   ...
}
@Component
public class ElectricEngine implements Engine {
   ...
}
- 自动装配默认对象:
@Component
public class Car {

   @Autowired
   public Car(Engine engine) {
      this.engine = engine;
   }
   ...
}
循环依赖(@Lazy)
如果对象之间出现了循环依赖,不能成功地创建其中任何一个Bean:
@Component
public class Foo {

   private Bar bar;

   @Autowired
   public Foo(Bar bar) {
      this.bar = bar;
   }
}
@Component
public class Bar {

   private Foo foo;

   @Autowired
   public Bar(Foo foo) {
      this.foo = foo;
   }
}
Foo构造需要Bar对象,Bar构造需要Foo对象;
为了解决打破循环,可以使用“@Lazy”注释,允许其中一个Bean先初始化:
- “@Lazy”使 Spring 推迟“带注解的bean”和“带注释的@Autowired位置”的初始化。
@Component
public class Foo {

   private Bar bar;

   @Autowired
   public Foo(@Lazy Bar bar) {
      this.bar = bar;
   }
}
@Component
@Lazy
public class Bar {

   private Foo foo;

   @Autowired
   public Bar(Foo foo) {
      this.foo = foo;
   }
}